Procrastination

This morning, as I sat at my computer checking my email and doing a thousand other time wasting things that people do on the computer, I noticed a post-it sticking out from a pile of papers on my desk.  I pulled it out and saw a list I wrote a couple of weeks ago of things I wanted to write about on the blog.  One of the items was “this is what happens when you procrastinate.”  I cannot for the life of me remember what I did or saw that made a good story about the perils of procrastination.  The mystery list item does, however, provide another apt example of why you shouldn’t procrastinate.  If you don’t get to your to-do list in a reasonable amount of time, you’ll forget what your notes mean.

© 2011 The Beehive All Rights Reserved

Vacation Day 4: Disneyland

Are you tired yet?  Because by Day 4, we were tired.  Nonetheless, we pressed on to Disneyland.

Digression:  We went to Disneyland, not California Adventure.  We ran into families at the wedding we went to on Day 5 and I asked the kids, “what was you favorite ride?”  and got a lot of “Tower of Terror!” and “World of Color!” and I was like “huh?”  Anyway, the point is, it’s really one park, even shares a parking lot, but they give it two names so they can charge you more for access to the whole thing.  I’ll remember that next time and get the park hopper pass.

Back to our day of fun.  A few days prior, when we got back from the Queen Mary, I checked Facebook and I saw that my friend Ashley had just arrived with her family at Disneyland.  Long story short, we ended up talking on the phone and planning to get together.

So we met Ashley, her husband Mason, their girls Ava, Norah, Keira, and Serena, Ashley’s brother Jared, and Jared’s daughter Isabelle in Tomorrowland shortly after we got to the park.  Sound like a big group?  It was actually two short, because Ashley’s parents were also with them and just hadn’t arrived at the park yet.  We got Fast Passes for Star Tours (more on that later) because they run out, well, fast,  and rode the Buzz Lightyear ride.  It’s funny, Ashley lives two blocks from my parents and I randomly run into her 400 miles from home.  It was a great surprise that they were at Disneyland at the same time, and a delightful visit.

Ashley’s family had a few days at the park and we were only there for one, so we went our separate ways.  We rode all the usual suspects: Indiana Jones Adventure, Jungle Cruise, Pirates of the Caribbean, Haunted Mansion, Big Thunder Mountain Railroad, Space Mountain, the Tea Cups, Mr. Toad’s Wild Ride, and so on.

Our first misadventure occurred on Splash Mountain.  We were actually nearing the end of the ride when the boats suddenly started to stack up.  We sat motionless for at least 15 minutes, with a loudspeaker periodically reminding us to stay seated and assuring us our experience would continue shortly.  It didn’t.  Finally, an attendant came out and helped us all out of the boats and led us through the ride to an exit, where we received front of the line passes for the ride of our choice before being released back into the park.

I don’t think I’ve ever been on a ride when it broke down before.  It was weird to walk through the ride, behind the animatronic characters, and see all the inner workings, and to see the sort of “back stage” area of the park where only employees go.  I took a few pictures, but I’m not going to post them because they really didn’t want us taking pictures and because I think it really does take some of the magic away.

Let’s return to our Star Tours Fast Passes, shall we?  Even though we got them at 9am, our return time was not until between 5:30 and 6:30 pm.  We spent the day doing other stuff and returned shortly after 5:30, only to find that the ride was closed.  Closed!  Apparently for the second time that day!  Needless to say, we were disappointed.  But it was nothing a Dolewhip float (me) and a funnel cake (Steve) couldn’t fix.

We re-visited some of our favorite rides, and eventually decided we were about ready to head out.  Steve suggested that we might stop by Star Tours, just in case it was up and running again.  I was skeptical, but agreed.  And sure enough when we got there they had just opened it!  They honored our Fast Passes and we were pretty near the front of the line, which grew very quickly behind us.

And now, here is the one and only picture from Disneyland that turned out:

That is Steve in front of a vehicle at the Indiana Jones ride.  He’s pretty convinced it’s one of the actual vehicles used in Raiders of the Lost Ark, pointing out that it has the same license plate and a number of other details are identical.  And of course there is no way Disney’s imagineers could possibly have recreated something from the movie, right?

Sorry, Steve.  I only poke fun at you because you are cute.


Vacation Day 3: Universal Studios

On to Day 3: Universal Studios.  We did the “V.I.P. Experience.”  It’s pricey, but Steve has wanted to do it for a long time and for a number of personal reasons we decided now was the time to splurge.  I’ll talk about the stuff that isn’t part of the regular park admission.  It started with valet parking — not something I’m used to.  When we got to the park, an attendant ushered us into a V.I.P. room through a private entrance, where we were treated to a light breakfast and a screening of Back to the Future, Part II.

While we relaxed, our guide, Heather, came in and introduced herself.  After a few more minutes, she gathered our group of 15 or so, and off we went.  We started with rides.  Heather escorted us to the front of the line for each ride and held our bags while we road.  She also provided us with ponchos for the Jurassic Park ride in case we didn’t want to get soaked.  I opted to use the poncho; Steve did not.  I enjoyed The Mummy ride the most.  I think it’s less than a minute long, which sucks if you’ve been waiting in line for an hour, but it really doesn’t matter so much if you just walk right in.

After we exhausted all of our ride options, it was time for lunch:  a private, gourmet buffet.  I ate lobster macaroni and cheese and Ben & Jerry’s Cookie Dough ice cream for dessert.  (No criticizing my food choices — we were on vacation!)  Everything I sampled was tasty, but the best part was security turning people away because the restaurant was for “V.I.P.s only”.

After lunch, we started our back lot tour, which includes everything that’s on the regular tram tour and some extra stops.  We first stopped at a sound mixing studio, where actors “loop” dialogue that didn’t get picked up properly when the scene was shot.  Next, we walked around the sound stage for the TV show “Parenthood.”  I’ve never seen the show, but I gather most of it takes place inside a suburban home.  And that’s basically what the set was.  Walking through the inside, it was just like we were in a real house . . .

. . . except for one thing . . .

No ceilings.  This is because with all the actors, crew, and lighting that are in the space, it gets very hot, so they need the heat to be able to dissipate.  Who knew?

After the sound stage, we walked through a prop warehouse.  It was basically like a giant Goodwill, except they had a huge selection of pretty much anything you might need.

Of course, we went through some of the same areas the normal tour does. Jaws . . .

. . . a flash flood . . .

. . . Wisteria Lane (guess what: the flowers are fake!) . . .

. . . and the Psycho house . . .

. . . but when we got to the “War of the Worlds” set, we got to get our and walk around.  It was kind of fun because another normal tour drove through, but they couldn’t get out, and our group ended up in all their pictures.

They’ve also changed the King Kong exhibit since our last trip.  It’s now a 3D, 360 degree movie experience.  It’s cool, but lacks the charm of the big animatronic ape.

When our tour was finally finished, it was still only mid-afternoon, so we were able to do a second round of the rides we liked best (still with front-of-line privileges, but our guide was no longer with us to hold our bags).  It made me realize that a big reason an amusement park takes all day is because of all the time you spend waiting in line!  It was still pretty early when we were ready to go.

Before we drove back to our hotel, we did a quick lap of City Walk.  That place does not impress me.  But, we did see Jay Leno filming one of his “Jay Walking” segments for the Tonight Show.

And that’s about it.  We stopped at an awesome little burger-slash-Mexican place for dinner (Sam’s Burgers in Norwalk, maybe I was just starving but those were the best fries ever), and just relaxed for the rest of the evening.

© 2011 The Beehive All Rights Reserved

Vacation Day 2: The Queen Mary

On the second day of our trip, we visited the R.M.S. Queen Mary in Long Beach. In addition to its significance as a luxury liner and a World War II troop carrier, the Queen Mary has particular significance for Steve because his dad traveled from England to the U.S. on the ship after living in England for several years as a boy.

When the ship was retired from service in 1967, the city of Long Beach purchased it and turned it into a tourist attraction, museum, hotel, and event facility (there’s even a wedding chapel).  The next highest bidder wanted to use it for scrap metal, so we are pretty lucky Long Beach won and we can still see it.  In addition to the general self-guided audio tour, the Queen Mary offers a guided Behind-the-Scenes Tour (focusing on the ship’s history and service as a passenger liner), a WWII Tour, and a Haunted Encounters Tour (which we were told is the most popular and happens to be the one we did not do).  As part of our ticket package, we also got to walk through a Cold War era Soviet submarine docked along side the Queen Mary.

We started with the Behind-the-Scenes Tour.  By far the best thing about it was our tour guide.  I can’t for the life of me remember his name, but he is featured on the Queen Mary website.  He looks like a ship’s captain there, but he’s really a tour guide. Probably the most animated tour guide you’ve ever seen in your life.  He didn’t just give us the tour, he performed it.  Every word was slowly and clearly enunciated with flair.  This was most evident in his explanation of the different classes of passengers.

You see, from the movie Titanic, most people think first class passengers are on the upper decks, second class passengers in the middle decks, and third class passengers below.  Not so on the Queen Mary.  Rather, the class section was determined by “smoooooooothness of the ride.  Smoooooooooothness of the ride.  Smoooooooothness of the ride . . .” and you get the idea.  I wish I could convey the gestures that went with it, sort of a slow horizontal movement with the hands.  Anyway, the smoothest ride was the center of the ship on all the decks from top to bottom.  Second class was toward the aft (they got engine vibration).  Third class got stuck with the bow because, in rough seas, it had a tendency to go “DOOOOOWWWN into the waves!  DOOOOWWWN into the waves!  DOOOOWWWN into the waves!”  Pretend your hand is a ship and plunge it DOOOOWWWN into the waves and you get the idea.

Speaking of the Titanic, which ship do you think is bigger, the Queen Mary or the Titanic?  Turns out Titanic was only a big movie, and the ship could fit inside the Queen Mary 1 1/2 times.

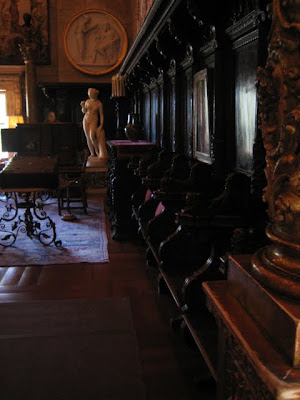
Ok, back to the tour.  The Behind-the-Scenes Tour was mostly through areas of the ship that are not open and on the self-guided tour.  Unfortunately, many of these spaces were dark and my flash was less than helpful, so the pictures were really bad.  I did get decent pictures of the first class suite we looked at.  I thought the living room was quite spacious, for being on a boat.

You might notice that there are four valves by the tub/shower in this next picture.  Apparently, at the time, people believed salt water baths provides great health benefits, so you had hot and cold fresh water, and hot and cold salt water.

The bedroom, also rather spacious, for being on a boat.

And finally, the HVAC, a.k.a. a fan.

One of the other visitors on the tour asked why the ship didn’t use a steam heat system, seeing as it is a steam ship.  Our guide didn’t miss a beat.  They couldn’t use steam heat because the ship was extensively decorated with woods from various parts of the British Empire.  This piece of inlaid wood artwork showcases more than 30 of the 50-some different species of wood used on the ship

This artwork is also a good example of the Art Deco style used throughout the ship.  Art Deco style flourished in the 30s and the WWII era, the heyday of the Queen Mary.  Art Deco is very ornamental, and part of the style’s success was in response to the forced austerity of WWII.  Its distinguishing characteristics include varied materials like aluminum, stainless steel, chrome, lacquer, and inlaid wood, and motifs like geometric curves, stepped patterns, chevrons, fountains, and sunbursts.

This area was kind of a mini-shopping mall when the ship was running, and it still is, just mostly with cheesy souvenir stuff.  You can see the step pattern and geometric curves in the ceiling detail.  Oh, and the cove lighting is pretty cool too.

I loved this mirror.  Look at the etched curves!

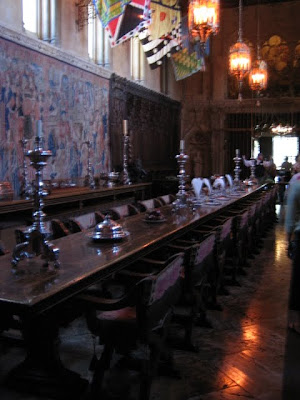
We ate lunch after the Behind-the-Scenes Tour.  I paid $6 for a little hot dog, a small non-refillable soda, and small bag of chips.  Doesn’t even come close to Costco’s buck-fifty dog and soda.  But look at the view we enjoyed while we ate!  You won’t find that at Costco.

After lunch we went on the WWII tour.  The threat of U-Boats made it too dangerous for the Queen Mary to continue to operate as a luxury liner between Britain and the U.S., but with a few modifications, it could effectively operate as a troop transport.  They removed all the luxury furnishings and added bunks, mounted some guns on the decks, and painted it Navy gray, which, in combination with its speed, earned it the moniker the “Grey Ghost.”  (“Grey” instead of “gray” because it’s a British ship.)

The Queen Mary carried up to 15,000 troops at a time, five times the number of passengers it could carry as a luxury liner.  As such, it did not have nearly enough lifeboats to accommodate all of them.  Luckily for the troops, it was never an issue, and the ship never fired its guns outside of training or morale-building exercises.

The look-outs manning the crow’s nest had it good.  Unlike most, this one was covered and heated.

At the other end of the ship, the sole remaining propeller, in a special viewing tank so guests can see it under the water. And yes, that’s a beer bottle floating there. Some people are so awesome.

I don’t have much to say about the Soviet submarine, the Scorpion.  I’ve been on the U.S.S. Pampanito in San Francisco and the U.S.S. Bowfin at Pearl Harbor (both WWII-era U.S. subs) and found both of those to be more interesting.

And that’s about it!  It took us a lot longer to see and do everything than I thought it would, and we didn’t even do the haunted ship tour.  A fun, tiring day.

© 2011 The Beehive All Rights Reserved


Vacation Day 1: Hearst Castle

Last week we took a little road trip to southern California.  The catalyst for this trip was the wedding of one of Steve’s close family friends in San Juan Capistrano, and we decided to make a road trip out of it and do some other stuff as well.  Day 1 consisted mostly of driving, mostly.  But to break up the seven-ish hour drive from the San Francisco Bay area of the Los Angeles area, we made a stop roughly midway at Hearst Castle in San Simeon.

I am sure I have driven through San Simeon at some point of my life, but I guess I never noticed it through the car window since I didn’t stop.  It is pretty nice.  Steve and I both noticed right away that the ocean is actually blue!  As opposed to the stormy gray that we usually see in, say, San Francisco or Santa Cruz.  Anyway, George Hearst apparently thought it was pretty nice too, since he bought a nearly 50,000 acre ranch (which eventually grew to over 250,000 acres) in 1865.

Speaking of George Hearst, when he was described on our tour, he did not resemble the George Hearst portrayed by Gerald McRaney on Deadwood even remotely.  Now, I know Deadwood is fictionalized, but I don’t think they would have the guy chopping off fingers and ordering murders if he was the kind, giving humanitarian the good people at the castle suggest.  But I digress.

It wasn’t George Hearst that built the castle, it was his son, William Randolf.  Little Willie played on that land as a child, and in his 50s, after building his media empire, he built la cuesta encantada – the enchanted hill.  Hearst built the castle over a 28-year period with the help of architect Julia Morgan.  Morgan herself was something else.  She was the first woman to graduate with a degree in architecture from the Ecole des Beaux-Arts in Paris, and designed over 700 buildings in California throughout her career. Photo of Hearst and Morgan, below, from Wikipedia.

Our tour started with a bus ride up a long and winding road to the top of the hill on which the castle sits.  We got some amazing views of the ocean, the hills, and animals that are descendants of the ones that used to reside in Hearst’s private zoo.  I can’t remember exactly what kind of animals we saw, but we did not see zebras, which the place is famous for.

We met our guide at the top.  He led us to the main facade of la casa grande and laid out the ground rules, which were: (1) stay on the tour mats and (2) don’t touch anything.

Once we entered the house, our first stop was the Assembly Room, which is where Hearst and his guests would gather for cocktails before dinner.  It appears I did not take a picture of this room as a whole.  I’m sure you can find one online if you are interested.  My best description is lots of fancy paneling and mouldings, tapestries all over the walls, fancy furniture, statues, and really nowhere for the eye to rest.  In other words, busy.  What I did take a picture of was the antique church choir stalls used as paneling on the lower walls.

Next we headed to the Refectory, or dining room.  This I did get a picture of, though it’s a bit blurry because it was pretty dark in there.  The room is pretty Gothic-inspired.  You can see the tell-tale pointed arch windows at the top of the wall at the end of the room.  The chairs, though, are Dante chairs from the Renaissance period, evident in the interlocking X shape of the legs.

My favorite part of this room was a carved wood statue of the Madonna and Child because it demonstrates the “Gothic sway” that was common in depictions of Mary and Jesus during that period.  It’s the gentle s-curve created in her body by holding the child on her hip.

We pressed on to the Billiard Room.  This room contained the most expensive piece of art in Hearst’s collection, a tapestry previously owned by Catherine de Medici.  It reminded me immediately of a series of early Flemish renaissance tapestries called The Hunt of the Unicorn.  The foliage is extremely detailed, the figures are pretty flat looking, and the horizon line is very high in the background – it’s pre-Brunelleschi and linear perspective.  Turns out it is a Flemish tapestry circa 1500.  Score 1 for school.

You might also notice the suspended light fixture smack in the middle of the photo.  Our tour guide mentioned that Hearst gave specific instructions that all light fixtures were to display the beauty of the incandescent bulb.  I guess at the time it was a big deal to have your whole house lit with electric bulbs.

The next room was uninteresting, except for the guy who decided he didn’t want to stay on the tour mat.  And after several requests from the guide and the security guard in the room, he decided to step onto an antique rug instead of back on the mat, which set off an alarm.  Good times.

Our final stop was the theater, where we viewed some silent movies of Hearst and his guests at the castle.  This room featured caryatids, which are columns carved to look like women, up and down the room, and holding the room’s light fixtures (again, notice the exposed incandescent bulbs?).

Once we finished the tour proper, our guide released us to roam the expansive grounds.  The views are incredible and the pools are amazing.  Here we are at the outdoor Neptune Pool.

The structures are actually pieces of ancient Roman temples Hearst imported.  They weren’t hard to find because the Romans were prolific builders.  They had perfected the art of building with slow-drying concrete and veneering with marble (as opposed to the Greeks, who built with solid marble), so they saved lots of time and money that way.

Of course, Hearst needed an indoor pool as well: the Roman Pool.  It may be hard to appreciate in these photos, but the entire inside of the pool is made up of small mosaic tiles.  I cannot imagine the hours of work that must have gone into it.

Also, check out the ladders in and out of the pool.  They are solid marble.  Not the skimpy plastic and metal you and I are used to, huh?

Here’s was I didn’t like about the tour.  We took the Grand Rooms tour, which is the one recommended for first time visitors.  For your $25 entrance fee, you get to see a whopping five rooms.  That’s right, five.  Did I mention there are 136 rooms in the house?  So you get to see less than 4 percent of it.  For $25 more dollars, you can see four more rooms on the Upstairs Suites tour.  And for yet $25 more dollars you can see four more rooms on the Cottages and Kitchens tour.  And there is no discount for doing all the tours in one day even though you are only taking one bus ride to the top of the hill instead of three.  Contrast that with tours of another wild estate built by a crazy rich person, the Winchester Mystery House in San Jose, which takes you through 110 of the 160 rooms on the basic mansion tour for $30.  Talk about a bigger bang for your buck.

Finally, W.R. Hearst’s mother was apparently the major benefactor of the University of California at Berkeley at the time, so our docent made a number of shameless digs at Stanford, which is seriously not cool.  If you got into Cal and Stanford, where would you go?  That’s what I thought.

© 2011 The Beehive All Rights Reserved

Finally Finished

Well, mostly finished, mostly.

Of course, we finished lining the edge of the path with cobble stones in pretty short order after our last post.

But we had no intention of leaving the rest of it just dirt.  I’ve been doing tons of research pretty much since we started removing the old landscaping rock over a year ago about low-maintenance, low-water plants that would be suitable.  We ultimately decided to go with a Mediterranean look, since California is a Mediterranean climate and those types of plants should thrive here without much tending.

If you’ve been reading for a while, you know that we already had grapes planted, so that worked out great with our theme.  We also got five half wine barrel planters last summer from a Sonoma-area winery thanks to Steve’s parents, who live in the north bay.  (I highly recommend going to a winery for barrels if that is feasible, rather than paying $40+ at HD, Lowes, or other hardware stores.  Our cost was significantly less.)  We planted rosemary and lavender in them, with some creeping thyme as ground cover between them, and then didn’t blog about it.

Another thing we didn’t blog about is happening on the other side of the yard.  We planted lamb’s ear (stachys) and some purple salvia of unknown species, which hasn’t flourished quite as much as the lambs ear.

The more recent additions include blue fescue (fesctuca glauca), blue oat grass (helictotrichon sempervirens), yarrow (achillea millefolium), euphorbia, artemesia, dusty miller (senecio cineraria), campanula, sedum, rue (ruta graveolens), daylily (hemerocallis), snapdragons (antirrhinum majus), curry plant (helichrysum italicum), phormium, artichokes, and culinary sage and oregano.  There are also two tomato plants Steve’s mom gave us, but those are temporary for the summer.  Pretty much everything else we chose is a perennial, so we won’t have to replant every years.

Finally, with the help of our friends Abby and Roxanne, we put mulch over the whole thing.  Well, mostly the whole thing, mostly.  There are a few areas left un-mulched because (1) after running out of mulch the second time I did not want to go back to the store and (2) I’ve ordered a few other things that are going to ship in the fall that will be planted in some of the uncovered areas.

So how are we just mostly finished, if there is nothing more to plant until my order arrives in the fall?  Irrigation.  I originally planned for no irrigation.  I don’t think Steve was on board with this, and in retrospect, he was right. The majority of the plantings won’t need anything but rainwater once they are established.  I thought we could live with watering them by hand until the rain comes and by next summer, they won’t need the water.  That’s been going on a week or two now, and let me tell you, it takes forever.  So a drip system is going in, even if it is temporary.  Plus, I have since learned that even though native climate plants will not die with no additional water, they will really thrive if they do get it.  So maybe it won’t be temporary.

© 2011 The Beehive All Rights Reserved

The Sweetest Thing

A week or so ago, my mom, my sister, and my 2-year-old niece, Allison, came over for a visit. We were sitting in the kitchen chatting, and Allison wandered off into the other room. Of course, when things are quiet for a few minutes, you figure the kid must be up to no good, right? So I went after her to see what was up and this is what I found:

She hoisted herself up on the chair by the stairs and quietly flipped through a little album I made of pictures taken with disposable cameras at our wedding. The whole thing seemed to fascinate her, but she got particularly excited when she recognized people.  Isn’t that precious?

© 2011 The Beehive All Rights Reserved

Follow the Cobble Stone Road

This weekend, not surprisingly, we continued working on the new path in the front yard.  We had two main goals: (1) to loosen up the soil and mix in the soil amendment and (2) to line the path with cobble stones to define its edges.

We already had a big pile of soil amendment sitting in the driveway, which we had delivered with the birds eye gravel a few days ago.  We didn’t have the cobble stones delivered at the same time, though, and here’s why.  First, I calculated that we needed 1/2 a cubic yard of cobble stones to line the edge of the path, but the landscape supplier will not deliver less than 1 cubic yard of any given material.  Second, the delivery trucks only have two bays, so they can only deliver two different materials at a time.  Since we were already having gravel and soil amendment delivered, it would have been an additional delivery (at $50 a pop) and we would have had to buy twice as much as we needed.  No thanks.

The gentleman I spoke with at the landscape supply place suggested that we come in and bag some cobble stones ourselves.  That way, we would not incur extra delivery costs or have a ton left over.  Plus we would be able to avoid broken stones, and actually pick out the nice looking stones.  So we did.

I wish I had brought my camera, but maybe a description of the place would suffice.  Essentially, there are many bays created by cinder block walls, each one filled with a different material, gravel, rocks, barks, sand, dirt, you name it, they have it.  We backed my car right into the bay filled with large cobblestones, put our bags in the back seat, and started filling them up, stone by stone.  We were warned to put the bags in the car and then fill them, because there is no lifting those things once they are full.  I would also suggest bringing gloves.  I don’t know what we were thinking not bringing any, since we use work gloves for practically everything.  They certainly would have come in handy.  Also, sensible shoes.  Climbing all over a giant pile of cobble stones in flip flops was probably not the smartest thing I’ve ever done, and I’m lucky I didn’t smash any toes.

After a few other errands, we did finally get to work on the yard, but we only got about half way through what I thought we could accomplish this weekend.  We mixed the soil amendment into the lower part of the yard and lines one side of the path.  I think it looks pretty good; we just need to finish the other half and get some plantings in there.  I don’t see anything happening until next weekend though, and I can imagine our neighbors complaining any minute now about the pile of soil amendment still in our driveway.


© 2011 The Beehive All Rights Reserved

Bonus Path Post!

I really didn’t think we’d have much to add right away on the path progress, but it looks like things are moving right along!

I had two cubic yards of bird’s eye gravel delivered yesterday morning.

It was hard to watch the delivery guy dump a huge pile of gravel on the driveway because, as you may recall, we already have another huge pile of rocks that used to be in the front yard that we are trying to get rid of, slowly but surely.

Anyway, I thought I might surprise Steve by having the whole path filled in when he got home from work.  I got started first by laying the weed block down on the path area.  This was a little bit tougher than I thought.  Because the path is all curvy, I had to cut the weed block into many pieces to make it fit, rather than just rolling it out as I would have been able to do if the path was just a straight line.  This meant I needed a lot more cramp-ons (giant staples you hammer into the ground to hold down the cloth).  It also took a lot more weed block than I originally calculated because you have to overlap by several inches at each joint, and I had not considered that the curve would require so many joints.  So, that meant a trip to Home Depot.  And, because I’m conscientious about time and gas, I packed in a few more errands while I was out, which meant I didn’t really even get to working on this until after 6PM.

Okay, back to the actual path construction.  I ended up with two rolls of weed block, 3 feet wide by 50 feet long, and 40 cramp-ons altogether.  Since the path is 4 feet wide, I cut the weed block in pieces 52 inches long, so there would be a couple of extra inches on each side of the path.  Then I just started laying them down, overlapping by at least 2 inches, and often more to accommodate the curve.  This is what it looked like when I was done:

Then came the “easy” part.  I just started loading up the wheelbarrow with gravel and dumping it over the weed block.  When I say “easy,” I mean easy once you get the hang of it.  Also, “easy” in the sense that’s it’s not rocket science, as opposed to it not being tiring and tedious work.

I learned a couple of things.  One is not to overfill the wheelbarrow.  Just because there is physically more room in the wheelbarrow does not mean you will be able to control it.  In fact, you will likely end up tipping it over accidentally and dumping gravel exactly where you don’t want it.  Two is to dump the gravel in from the lower side of the slope, rather than the upper.  It’s a little easier to empty from the upper side, but again, harder to control, and if you lose control you’ll end up crushing the bender board edging, requiring emergency repairs.  Steve helped with both of these situations when he got home.

Last night I think I got maybe a third of the way done.

I started back at it this morning and finished shortly after 1pm.

Of course, it’s not quite finished.  I did tamp it down some to settle the gravel a bit, but we’ll probably need to do that a bit more, and perhaps wet it while doing so.  Then we’ll fill in any sparse area with leftover gravel.  We’re also going to line the edges with cobble stones to give it a rustic look.  And of course, all the dirt around it needs leveling, and the addition of some soil amendment (you might have noticed a big pile of dirt on the driveway in some of the pictures), and of course, plants.  But reasonable progress, I think.

© 2011 The Beehive All Rights Reserved

The Path to Nowhere

Last summer, we shared a lot of work we did on a part of our front yard.  It took us weeks — maybe it was actually months — to clear our yard of ugly white landscaping rock, overgrown rosemary, and weeds.  By the time we were done, we were too tired to actually replace anything we removed with something new.  We took a little vacation from yard work, did some upkeep on other areas that we had been neglecting, and before we knew it, the bad weather was upon us.  So the space sat idle for months with nothing more than occasional weeding.


Now that it has stopped raining and the weather is actually behaving somewhat like we expect it to in June, we are back outside.  Part of our plan is to create a winding little gravel path.  We thought it would be visually interesting, provide access to the interior areas of the space, and provide a bit of a low maintenance area (no watering and easy weeding with no actual plantings).  We did the excavation of the path area recently.

We (read: I) did some research as to how to DIY a gravel path.  We (I) decided to follow the instructions in an old edition of the Sunset Western Landscaping book.  In a nutshell, it suggested excavating down about 3 inches, installing some sort of edging, adding a 1-inch layer of sand, tamping it down, then adding a 2-inch layer of your desired gravel. Pretty easy, right?

Day 1 of our project involved excavating the upper side of the path and installing our edging.  We chose 4″ redwood bender board (which is actually only 3.5″, not 4″ — where did the lumber industry learn how to measure?).  We had already marked off the area where we wanted the path to go with some landscaping stakes and string.  Actually, it was so long ago, the string was long gone.  So we just connected the dots of the stakes with a gentle curve and held the bender board in place with more of the same landscaping stakes.

The bender boards were originally 8′ long, but we found we had to cut some of them shorter because we could not get the curve we wanted and stay level with the slope without twisting the board.  We also overlapped the boards by a couple of inches at each joint to prevent dirt from seeping or gravel seeping out through the seams.

So this is what we had at the end of Day1:

We were pretty pleased.  It didn’t look bad and it didn’t really take all that long.  We were confident we’d have no problem finishing the excavation on Day 2.  Well, the second day ended up being a little bit harder than we expected.  It involved a lot more measuring because we wanted to make sure the width of the path was consistent.  Plus, in addition to just digging the sides and installing the bender board, we needed to dig out the whole middle of the path and make sure it was nice and even and level (we used a 10″ square hand tamper to help with that).

It took us pretty much all day, but we reached our goal of getting the structure of the whole path in place.  All we need to do now is order the fill materials and dump them in.

© 2011 The Beehive All Rights Reserved