Finally Finished

Well, mostly finished, mostly.

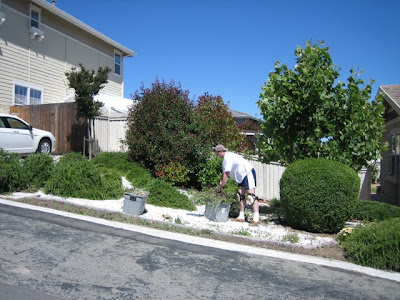
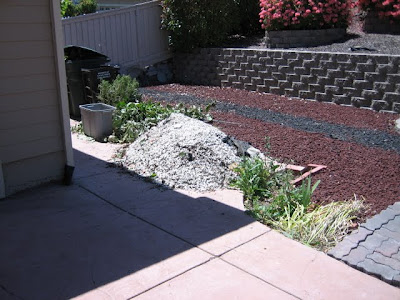
Of course, we finished lining the edge of the path with cobble stones in pretty short order after our last post.

But we had no intention of leaving the rest of it just dirt.  I’ve been doing tons of research pretty much since we started removing the old landscaping rock over a year ago about low-maintenance, low-water plants that would be suitable.  We ultimately decided to go with a Mediterranean look, since California is a Mediterranean climate and those types of plants should thrive here without much tending.

If you’ve been reading for a while, you know that we already had grapes planted, so that worked out great with our theme.  We also got five half wine barrel planters last summer from a Sonoma-area winery thanks to Steve’s parents, who live in the north bay.  (I highly recommend going to a winery for barrels if that is feasible, rather than paying $40+ at HD, Lowes, or other hardware stores.  Our cost was significantly less.)  We planted rosemary and lavender in them, with some creeping thyme as ground cover between them, and then didn’t blog about it.

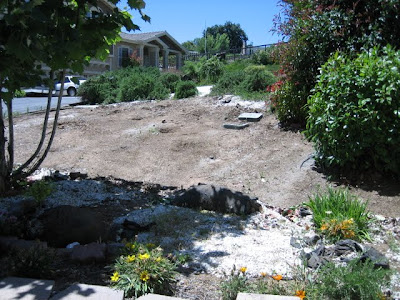
Another thing we didn’t blog about is happening on the other side of the yard.  We planted lamb’s ear (stachys) and some purple salvia of unknown species, which hasn’t flourished quite as much as the lambs ear.

The more recent additions include blue fescue (fesctuca glauca), blue oat grass (helictotrichon sempervirens), yarrow (achillea millefolium), euphorbia, artemesia, dusty miller (senecio cineraria), campanula, sedum, rue (ruta graveolens), daylily (hemerocallis), snapdragons (antirrhinum majus), curry plant (helichrysum italicum), phormium, artichokes, and culinary sage and oregano.  There are also two tomato plants Steve’s mom gave us, but those are temporary for the summer.  Pretty much everything else we chose is a perennial, so we won’t have to replant every years.

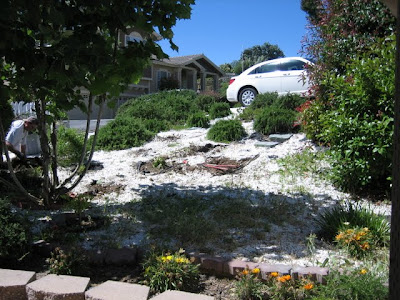
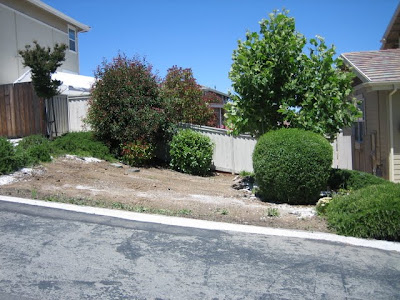
Finally, with the help of our friends Abby and Roxanne, we put mulch over the whole thing.  Well, mostly the whole thing, mostly.  There are a few areas left un-mulched because (1) after running out of mulch the second time I did not want to go back to the store and (2) I’ve ordered a few other things that are going to ship in the fall that will be planted in some of the uncovered areas.

So how are we just mostly finished, if there is nothing more to plant until my order arrives in the fall?  Irrigation.  I originally planned for no irrigation.  I don’t think Steve was on board with this, and in retrospect, he was right. The majority of the plantings won’t need anything but rainwater once they are established.  I thought we could live with watering them by hand until the rain comes and by next summer, they won’t need the water.  That’s been going on a week or two now, and let me tell you, it takes forever.  So a drip system is going in, even if it is temporary.  Plus, I have since learned that even though native climate plants will not die with no additional water, they will really thrive if they do get it.  So maybe it won’t be temporary.

© 2011 The Beehive All Rights Reserved

Photoshop Fun

As my friend Ginger once wrote, “I have really let my blog go!”  I guess it just hasn’t been at the top of my priority list lately, and I apologize profusely to the two of you.

Anyway, I have been taking a design class that includes some basic Photoshop skills as part of it, and I thought my final project was fun enough to share.  In a nutshell, the assignment was to use the skills we had learned to create an homage to an artist.  There were some detailed requirements relating to number of images used, different techniques we were required to employ in some fashion or another, and so forth, but that’s all quite boring, so here is the final product.

The subject of the first montage I did was impressionist Edgar Degas.

The second montage was a tribute to Sergio Leone, which I mostly chose because I thought Steve would enjoy it.  Turns out I thought it was pretty fun as well.


And now, a quick word on copyright:  Obviously, any copyright on any of the images I used in the Degas montage has expired.  There may, however, be copyrighted material in the Leone piece because those movies are newer.  I do not intend to infringe on anyone’s copyright; I made this for educational purposes (i.e. learning Photoshop) and I think it’s Fair Use.  If you are the copyright holder of any of the images I used and you disagree, please let me know.

© 2011 The Beehive All Rights Reserved.

Allison’s New Bib

My mom busted out her sewing machine and made this clever new bib for my niece, Allison.  She bought a tea towel with a fun stripe on it, cut a hole towards one end of it, and edged the hole with ribbing to slip over the baby’s head.

Voila, it’s a bib that provides way more coverage than a typical bib for messy feedings.

Allison looks super-cute in it too.  Of course, she’s always cute.

© 2010 The Beehive All Rights Reserved

Yard Work

This weekend was a hot one in our neck of the woods. That didn’t stop us from getting outside and doing some work in our front yard, though. We’ve been unhappy with the look of it since we moved in, and our neighbors are not too thrilled with the white landscaping rock the prior owner was so fond of. Here’s a look at the area we’ve decided to tackle first just as we were starting on Saturday morning.

On Saturday, we pulled out all the “volunteer” rosemary. Rosemary bushes were planted around the edge of the yard area, but they self-seeded and created little mini-bushes — and some not so mini — all over the center of the yard. The weather was great and a strong breeze kept us cool while we worked.

Sunday, we cleared a bunch of the offensive white landscaping rock from the part of the yard we cleared of rosemary the previous day. This was a real chore. I don’t think we ever came up with a really efficient way to do it. We tried rolling up the weed barrier with the rocks in it, but they spilled out the edges. Further, the prior owner didn’t use conventional weed barrier for the entire yard; in some places, flattened out bags from mulch or potting soil were used, and we even found Home Depot shopping bags in some places. We also tried using the weed barrier to move the rocks into piles, which we then shoveled into buckets, but that seemed to take a long time as well.  And, we were left with this nifty pile to deal with when we were done.

So here’s what our neighbors have to look at now, until we get back to it next weekend. Probably won’t get any better, since we’ll just be pulling out the mature rosemary and removing still more rocks. But we’ve got plans, and it will eventually come together, slowly but surely.

© 2010 The Beehive All Rights Reserved

Color Me Pleasantly Surprised

You may have noticed that the foam core model in my last post was entirely white.  In Elements and Principles, that’s a requirement.  We’re learning about form and shape, not about color.  In my color theory class, on the other hand, color is, unsurprisingly, the main focus.  So my latest model for that class is much more interesting, color-wise.

The assignment was to

Create a model with a color scheme representing a color theory as discussed in class and in your reading assignments.  According to the color theory you select, how does your project influence behavior?  Use two planes, each 10” square and at least 3, 3-D objects.

We were permitted to use an artist, piece of art, or artistic movement as our color theory.  I have my own opinion as to why this was allowed, but I won’t get into that here.  I overheard some of my classmates discussing Rococo furniture between classes, and that reminded me of a particular painting I like from the Rococo period by Jean-Honore Fragonard called “The Swing.”

In addition to drawing from the colors in this painting (pink and green, a complementary color scheme), I also tried to use the curving forms common in Rococo art and design.  This is what I came up with:

While I was working on this during studio time, the instructor pointed out that the colors are colors that I wear often and asked if the color theory was based on the theories of Johannes Itten.  Itten was an artist and theorist associated with the Bauhaus school.   He was the first to associate four distinct color palettes with certain types of people, now known as seasonal color analysis.  His research indicated that people would tend to paint the colors that they are.  You may be familiar with more recent popular works on the subject such as Color Me a Seasonor Color Me Beautiful.

Back to the point, my instructor’s comments made me think that there really is something to Itten’s work, and that I was drawn to The Swing and chose to use those particular colors because they are my colors.  I thought it was interesting.

© 2010 The Beehive All Rights Reserved

Adventures with Foam Core

Here is my latest project for my elements and principles of design class.  We recently learned about circulation, so the finished piece had to incorporate a minimum of two path configurations (linear, radial, spiral, grid, and/or network), one of each path-space relationship (path that passes by spaces, path that passes through spaces, and path that terminates in a space), and one of each form of circulation space (enclosed path, path open on one side, and path open on two sides).  In addition to demonstrating these elements of circulation, we were required to use at least one of each of the primary elements and forms, principles of repetition and rhythm, positive and negative spaces, additive and subtractive forms, regular and irregular forms, and articulation of form/surface articulation.  The piece also had to incorporate a base plane of limited size.

As if all those requirements were enough, the piece actually had to be based on a concept.  Imagine that!  And the concept was a group effort.  We actually got to choose our groups, so I ended up with three additional stellar people, and we chose the four seasons as our concept.  I ended up with spring.  Here is my design intent statement:

Our group project as a whole represents the four seasons and, more specifically, the changes in light during the different seasons.

In spring, the days grow longer and we experience more and more sunlight as summer approaches.  The two 10×10 inch planes on opposite sides of the piece illustrate this phenomenon.  Each contains thick lines that prevent light from entering into the center of the piece.  At one corner, these lines are very close together, letting in little light.  As they travel away from the corner, the negative space between the lines grows, letting more light into the center of the piece.   Similarly, the trapezoidal planes that connect the two 10×10 planes contain “windows” of negative space.  The windows are small near the enclosed corner, but become larger and more open farther away from the enclosed corner.

The season of spring also evokes thoughts of re-emergence and new life; species come out of hibernation (whether it be literal, as in the case of bears, or figurative, as in the case of humans bundled in bulky winter clothes, blankets, and heated buildings) and plants begin to bud and blossom.  This emergence is represented by the forms of the pyramid and cube, which are surrounded by layers of larger forms that appear to be peeling away.  The piece as a whole is a larger version of these smaller forms, as it contains three spherical forms in the interior enclosed corner and the four planes are opening up away from the spheres similar to the way the outer pyramid and cubes are opening away from the smaller central forms.

© 2010 The Beehive All Rights Reserved

Dining In

My latest project is painting the dining room.  I’m probably about 2/3 done at this point.  Here is what it looked like before.

And I’ve also added a little fall flair.

Assuming I don’t get side tracked, the afters should be coming in the next couple of days.  And I have learned my lesson about putting the old curtains back up, so don’t expect to see those again.

© 2009 The Beehive All Rights Reserved

The Times They Are A-Changin’

DISCLAIMER: I am not pregnant.

I browse craigslist from time to time to see if there may be some diamond in the rough piece of furniture we might want or need for our house.  Last week, I found a great buffet/sideboard in a dark wood that matches our dining room table and chairs for a song.  The woman selling it was also trying to unload a changing table.  Solid wood, only $40!  Needed a bit of wood glue to repair the drawer front, but I decided to take it.

Did I mention I am not pregnant?

We do have a five-month-old niece, though.  And I hope she comes to visit more often.  And now that we have a changing table just for her, there really is no excuse for her not to be visiting. 

In addition to needing the small drawer repair, I also wanted to put a new cover on the pad, because who knows what the prior owner did on that thing.  Most likely things involving human waste.  We don’t want those things touching Allison.  So I went to the fabric store to pick out some super-cute kiddie fabric.  Here’s how it turned out. 

I loved this bright cotton fabric with little bugs all over it.  I choose a coordinating green flannel for the other side so the baby’s butt could rest against something a little cozier in cold weather.  I sewed some hot pink bias tape into the seam as a sort of faux piping, and closed the cover with hot pink buttons. 

I think it turned out so cute, I now have the urge to design an entire kids room around it. 

And by the way, I am not pregnant.

© 2009 The Beehive All Rights Reserved

Mastering the Master Bedroom

After three days of painting, I finally finished the master bedroom.  I carried the colors from the master bathroom into the bedroom, with Behr’s Silver Tradition on the walls and Soft Denim on the ceiling.  When it came to the bathroom, I differentiated the the small water closet from the bathroom as a whole by adding some horizontal stripes (check them out in this post).  I wanted to similarly differentiate the bedroom.  So here’s a peek from the bathroom.

I added an accent wall.  It’s Behr’s Provence.  Digression: I bought a quart of the stuff in an eggshell finish, which the guy at HD assured me would be enough for the one wall.  I wasn’t.  So I had to go back for a second can.  The two cans were totally different textures.  The first was watery.  It seemed strange to me because other Behr paint I have used has been pretty thick.  I assumed it was because the color was so much darker than what I have generally used, and the dark pigment affects the consistency of the paint.  The second can, however, was the thickness I was used to.  What’s the deal?  Luckily, I couldn’t tell the difference when they were applied.  So here is the rest of the room.

I’m not quite sold on the accent wall at this point.  Don’t get me wrong, I like the whole bedroom/bathroom combination much more than before.  And it’s not just getting rid of the lime green — the white walls in the bedroom had a lot of poorly-camouflaged Spackle-filled holes, and it was pretty clear the room hadn’t been painted since the house was built (a fact further evidenced by the way the walls sucked up the new paint).  But I love love love the bathroom and I really don’t feel that strongly about the bedroom.  Maybe it’s because the dark color against the light color makes it much easier to see that my edges are not perfectly straight.  Or maybe we just need to update the curtains (the new paint only serves to highlight that the ones that came with the house are Awful with a capital A) and furniture and get some art on the walls.  In any event, we’ll be living with it for a while and we’ll see how it grows on us. 

© 2009 The Beehive All Rights Reserved

Beautifying the Bathroom

When we moved in, our master bathroom was a grotesque shade of fluorescent green. One of our friends said we just needed a black light in the room.

The awesome green paint ranked high on our list of things to change as soon as possible, starting with the WC. I painted it in stripes of Behr’s Silver Tradition and Soft Denim.

I carried those colors into the main bathroom, but not the striping action. The ceiling became Soft Denim and the green walls were covered with Silver Tradition.

The whiter-than-white master bedroom is still in progress, but it’s getting a makeover too. To be continued . . .

© 2009 The Beehive All Rights Reserved