Dining In

My latest project is painting the dining room.  I’m probably about 2/3 done at this point.  Here is what it looked like before.

And I’ve also added a little fall flair.

Assuming I don’t get side tracked, the afters should be coming in the next couple of days.  And I have learned my lesson about putting the old curtains back up, so don’t expect to see those again.

© 2009 The Beehive All Rights Reserved

The Times They Are A-Changin’

DISCLAIMER: I am not pregnant.

I browse craigslist from time to time to see if there may be some diamond in the rough piece of furniture we might want or need for our house.  Last week, I found a great buffet/sideboard in a dark wood that matches our dining room table and chairs for a song.  The woman selling it was also trying to unload a changing table.  Solid wood, only $40!  Needed a bit of wood glue to repair the drawer front, but I decided to take it.

Did I mention I am not pregnant?

We do have a five-month-old niece, though.  And I hope she comes to visit more often.  And now that we have a changing table just for her, there really is no excuse for her not to be visiting. 

In addition to needing the small drawer repair, I also wanted to put a new cover on the pad, because who knows what the prior owner did on that thing.  Most likely things involving human waste.  We don’t want those things touching Allison.  So I went to the fabric store to pick out some super-cute kiddie fabric.  Here’s how it turned out. 

I loved this bright cotton fabric with little bugs all over it.  I choose a coordinating green flannel for the other side so the baby’s butt could rest against something a little cozier in cold weather.  I sewed some hot pink bias tape into the seam as a sort of faux piping, and closed the cover with hot pink buttons. 

I think it turned out so cute, I now have the urge to design an entire kids room around it. 

And by the way, I am not pregnant.

© 2009 The Beehive All Rights Reserved

Have Some Stew, Tuscan-Style

One positive result of unemployment is that I have been cooking a lot more than I used to.  The other night, I made Tuscan Chicken Stew for dinner.  It went something like this:

I bought a package of chicken thighs, a little over two pounds.  The original recipe called for skinless bone-in thighs, which my grocery store did not have, so I was stuck skinning them myself.  Not my favorite kitchen task.  I really don’t like touching raw meat, so I used latex gloves a la Alton Brown, which made it much less gross.  I coated the bottom of our cast iron dutch oven with a little olive oil, seasoned the meat, and browned it on both sides. 

While the chicken was browning, I chopped an onion and minced a few cloves of garlic.  I added the chopped veggies to the dutch oven after removing the browned chicken to a platter.  Let those cook a few minutes until the onion is translucent.  Then, add a tablespoon of tomato paste.  Stir the paste in and let the mixture continue cooking until it is well mixed and becomes a brick red color.  Next, add about half a can of chicken stock to the pot to deglaze.  You can substitute wine here if you like, but we aren’t big wine drinkers and generally don’t have any sitting around and ready to use in recipes, so the stock works just fine.  Let it boil down until it is a bit syrupy.  Then add the rest of the can of stock, a can of rinsed and drained white beans, and a can of diced tomatoes.  Nestle the chicken pieces into the stew and let it simmer for about 20 minutes or until the chicken is cooked through.  Then, add about eight ounces of baby spinach and simmer another minute or two until the spinach is wilted.  Serve and enjoy. 

When I made this, I really was not in the mood for it.  I really did not want anything tomato-y, but I had purchased the ingredients and needed to cook it before anything went bad.  I was pleasantly surprised.  The meal was hearty and extremely tastey.  It’s chock full of veggies and lean protein, too.  My only qualm with the dish is the bone-in meat.  It takes a bit or work to eat when it’s in a stew.  I’d say just use boneless thighs, but that would change the cooking times and the bones might add flavor to the stew that would be missed if they weren’t there. 

© 2009 The Beehive All Rights Reserved

It’s Curtains for You

I recently posted pictures of our freshly repainted bedroom.  The overwhelming consensus among the people who commented (all three of them) was that the curtains suck and they’ve got to go.  Which I don’t disagree with.  They came with the house and I want something new and not ugly.  I just put them back up because I don’t have that something new yet.  But it was pointed out that we don’t really need curtains.  So here is the room, sans curtains.

Better?  Still doesn’t exactly have a finished look, but I have some thoughts.  You know, for when we have money to buy all kinds of new furniture. 

My first idea is not really furniture at all.  I’d like to put some decorative molding above the bed.  I was thinking of creating a 3×3 grid of squares made of half round molding, painted either Silver Tradition, or white. 

As for curtains, I’m not sure we really need anything on the two small windows, but I thought this might look nice on the big windows.  I need to check it out in person to see if the color goes with the accent wall, which is what I was trying to pull from.  There are also some coordinating items that I might consider, like a throw or some decorative pillows. 

If that isn’t enough Scandinavian decor for you, I’m also thinking about replacing our dressers and nightstands with these (in black-brown).  Two next to each other just happens to be about the same length as the space from the side of the bed to each wall.  So I think we should each get two.  That will give us each six drawers for clothes, which should be plenty of space to replace the two mismatched dressers we have now across the room.  Plus they are about the right height for a nightstand, so they will do double duty if we put lamps and our alarm clocks on the top.  And speaking of lamps, I thought it might be a good idea to lean a mirror against the wall behind each lamp.  I’ve noticed that since we painted the wall dark, the light from the bedside lamps seems to get sucked up and it feels very dark.  The mirrors will reflect the light out and make it brighter. 

So, since we won’t be needing the two old dressers anymore, what should we do with that space?  I’d like to put two comfy chairs (gasp! the comfy chair!  can you name that tv show?), a small table, a floor lamp, and an ottoman to create a little sitting area we can use for reading. 

Haven’t really thought about art at all, but there is plenty of wall space for that.  Maybe a Fathead of the Colorado Avalanche logo?  They don’t have one of Patrick Roy.  Or not. 

© 2009 The Beehive All Rights Reserved

Apple Pie Sauce

On our last trip to Costco, we bought one of those plastic containers of Gala apples.  You know, the packs with an individual round slot for each apple that there’s just got to be something it would be useful for in the future that forces you to keep the empty container.  It seemed like a good idea at the time, because I was taking an apple to work every day in my lunch.  Not so much anymore.  The point is, these apples were past their prime and I did not want them to go to waste.  The solution?  Applesauce. 

We had 8 apples sitting in our fridge.  I peeled, cored, and chopped them into chunks.  The size of the chunks is up to you.  I remember when I was a kid, we made applesauce at one of our Brownie meetings.  We ate it warm, and it still had chunks of apple in it.  So I chose to make mine a little chunky.  Well, a lot chunky.  As I was peeling and chopping, a sprinkled a little lemon juice over the apple chunks as I added the new chunks to prevent them from turning brown before I got them on the stove. 

Once the apples were chopped and ready to go, I dumped them in a large saucepan with about a cup of water, brought the water to a boil, and let it simmer for 10 minutes or so, stirring occasionally.  The length of time you cook the apples for will depend on how big you make your chunks and how chunky you want the final sauce to be.  Bigger chunks means more cooking until they are tender.  If you want the sauce to be smooth, cook it until the chunks are very tender.  If you want chunks, they don’t have to be quite as tender. 

When the chunks were a bit short of my desired done-ness, I added about 6 tablespoons of sugar and a teaspoon of cinnamon.  I would have added a bit of nutmeg as well, but I didn’t have any.  At this point, I started to stir the sauce continuously.  This breaks down the apples and gives you the nice saucy consistency, as opposed to a bunch of cooked apples sitting in hot water.  I stirred for probably about 5 minutes until the sauce was the chunky consistency I wanted.  If you want it smoother, hopefully you cooked your apples a bit longer to being with and you can be more vigorous with your stirring and add a little mashing action.  And if you want it really smooth, you can run it through your food mill.  Because everyone has a food mill sitting around. 

I dished out the first two bowlfuls while it was still piping hot, and it was delicious!  I thought the chunky-ness of it made it taste like hot apple pie, so I am calling it apple pie sauce.  Steve said it didn’t taste like apple pie to him, but what does he know?

© 2009 The Beehive All Rights Reserved

More to Clean or Why I Hate Door-to-Door Salespersons

The other day, I’m sitting in front of the TV, minding my own business, when I hear a knock at the door.  Shocking because pretty much everybody I know that might even consider paying me a visit is gainfully employed and not hanging around my neighborhood in the middle of the afternoon.  Against my better judgment, I decided to answer it because it was an opportunity for human contact. 

It was a salesman.  A really good salesman, it turns out.  He was selling some sort of earth-friendly all-purpose cleaner.  He just needed a few seconds of my time to show me how great this stuff worked.  What else did I have to do?  He showed me how it can clean windows, streak free, and prevent future smudges and fingerprints.  He showed me how easily it will clean the tile grout in my entryway.  He showed me how it will strip the dirt off the siding of the house with just a wipe.  He showed me how it can even remove rust stains from my concrete driveway.  Pretty amazing stuff!

So now, my front window has a clean spot.  And the tile grout in the entryway has a clean spot.  And the siding on the porch has a clean spot.  And the rust spot on the driveway is partially cleaned away.  Which means I need to clean the rest of the front window, the entryway tile grout, the siding on the porch (and probably the rest of the house, once that’s clean), and the rust spot(s) on the driveway. 

Next time I’m out, I’m buying a “No Soliciting” sign.

© 2009 The Beehive All Rights Reserved

Mastering the Master Bedroom

After three days of painting, I finally finished the master bedroom.  I carried the colors from the master bathroom into the bedroom, with Behr’s Silver Tradition on the walls and Soft Denim on the ceiling.  When it came to the bathroom, I differentiated the the small water closet from the bathroom as a whole by adding some horizontal stripes (check them out in this post).  I wanted to similarly differentiate the bedroom.  So here’s a peek from the bathroom.

I added an accent wall.  It’s Behr’s Provence.  Digression: I bought a quart of the stuff in an eggshell finish, which the guy at HD assured me would be enough for the one wall.  I wasn’t.  So I had to go back for a second can.  The two cans were totally different textures.  The first was watery.  It seemed strange to me because other Behr paint I have used has been pretty thick.  I assumed it was because the color was so much darker than what I have generally used, and the dark pigment affects the consistency of the paint.  The second can, however, was the thickness I was used to.  What’s the deal?  Luckily, I couldn’t tell the difference when they were applied.  So here is the rest of the room.

I’m not quite sold on the accent wall at this point.  Don’t get me wrong, I like the whole bedroom/bathroom combination much more than before.  And it’s not just getting rid of the lime green — the white walls in the bedroom had a lot of poorly-camouflaged Spackle-filled holes, and it was pretty clear the room hadn’t been painted since the house was built (a fact further evidenced by the way the walls sucked up the new paint).  But I love love love the bathroom and I really don’t feel that strongly about the bedroom.  Maybe it’s because the dark color against the light color makes it much easier to see that my edges are not perfectly straight.  Or maybe we just need to update the curtains (the new paint only serves to highlight that the ones that came with the house are Awful with a capital A) and furniture and get some art on the walls.  In any event, we’ll be living with it for a while and we’ll see how it grows on us. 

© 2009 The Beehive All Rights Reserved

Praising the Pomegranate

November is National Pomegranate Month, so today we will say a few words in honor of the free radical-fighting fruit. 

Native to Persia, pomegranates have been cultivated in Iran, Armenia, Azerbaijan, Georgia, and the Mediterranean region for thousands of years.  The fruit was introduced to the Americas by the Spanish in the late 18th century, and we currently grow it in parts of California and Arizona for juice production. 

The edible part of the pomegranate is the juicy seed casing known as the aril.  High in vitamin C, vitamin B5, potassium, and antioxidant polyphenols, proponents taut pomegranate juice as effective in reducing heart disease and high blood pressure, not to mention scavenging those pesky free radicals.  The seeds themselves, when consumed with the aril, are high in fiber and unsaturated fat. 

The name pomegranate derives from the Latin pomum (“apple”) and granatus (“seeded”). In both Spanish and French, the words for pomegranate and grenade are the same (granada and grenade, respectively), likely due to the fact that the fruit and weapon are similarly shaped.  The French la grenade also gives us the word grenadine, the name of a fruit syrup originally made from pomegranates and widely used in cocktails.   

A while back, we saw on one of my favorite Food Network shows that grenadine is actually a pomegranate syrup.  Our only prior experience with grenadine was Rose’s Grenadine, so we never had any clue that it was in any way related to pomegranates.  Don’t get me wrong, Rose’s is certainly tasty and a staple in most well appointed bars, but it is not much more than sugar syrup with red food coloring.  So we decided to conduct a little science experiment. 

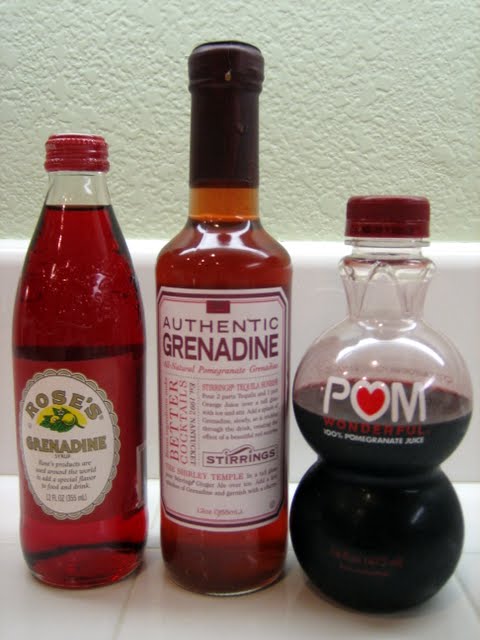
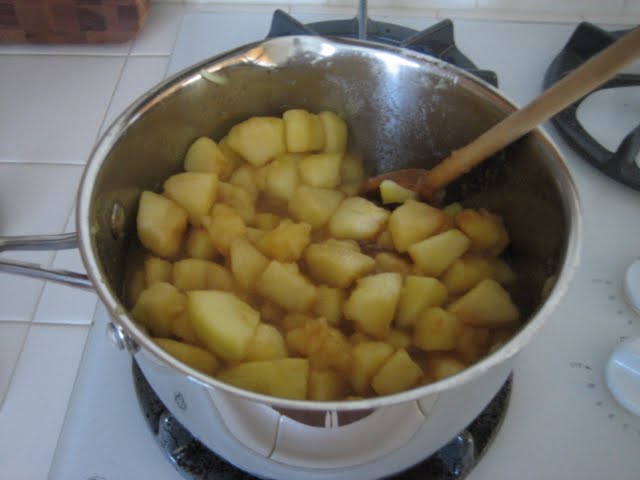
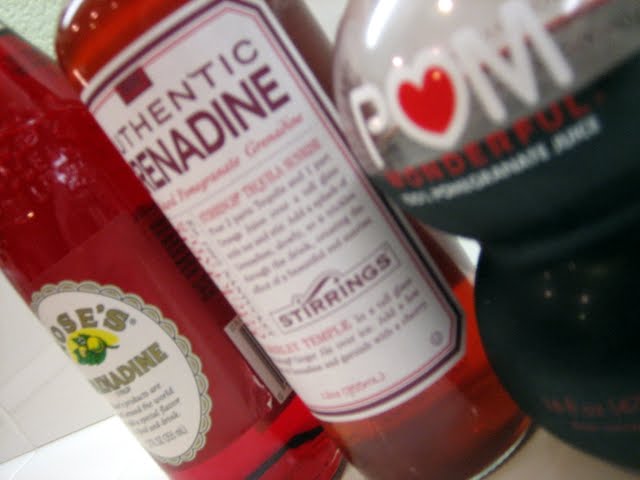
Steve made a batch of home-made grenadine using pomegranate juice and sugar, using a recipe courtesy of that favorite tv chef.  He started out with two bottles of pomegranate juice and after all the cooking and reducing ended up with less than a bottle of syrup.  He also bought two bottles of alternative grenadines to compare it with: the old standby Rose’s and a brand of authentic pomegranate grenadine. 

First, we poured a little bit of each grenadine into the bottom of a glass to compare.  Not surprisingly, the Rose’s was maraschino cherry red.  The store bought authentic grenadine was more of a pale pink, while our home made authentic grenadine was a deep, dark reddish purple.  Both the Rose’s and our home made grenadine were thick, sticky, and syrupy.  The store bought authentic grenadine was pretty thin, though, almost watery.  Finally, the taste test.  The Rose’s tasted like sugar syrup.  The authentic syrups, on the other hand, had a pronounced pomegranate flavor, with the home made syrup being much stronger than the store bought syrup. 

Next, we made a classic cocktail using grenadine: the Tequila Sunrise.  We mixed three identical glasses of tequila and orange juice and added a splash of grenadine to the top of each one.  Bar far, the Rose’s would win any cocktail beauty contests, giving the top of the drink a rosy blush.  The store bought authentic grenadine was virtually undetectable to the human eye.  And the home made authentic grenadine . . . well, it looked pretty gross, like a gray glob floating in the drink. 

Flavor-wise, the store bought authentic grenadine won out.  Although it wasn’t visible, it certainly added flavor to the drink.  And the home made syrup, well . . . surely the unappetizing look of the drink contributed to the fact that neither of us thought the final drink tasted good at all.

So there you have it, a few fun facts about pomegranates and our thoughts on various types of pomegranate syrup. 

© 2009 The Beehive All Rights Reserved