Apple Pie Sauce

On our last trip to Costco, we bought one of those plastic containers of Gala apples.  You know, the packs with an individual round slot for each apple that there’s just got to be something it would be useful for in the future that forces you to keep the empty container.  It seemed like a good idea at the time, because I was taking an apple to work every day in my lunch.  Not so much anymore.  The point is, these apples were past their prime and I did not want them to go to waste.  The solution?  Applesauce. 

We had 8 apples sitting in our fridge.  I peeled, cored, and chopped them into chunks.  The size of the chunks is up to you.  I remember when I was a kid, we made applesauce at one of our Brownie meetings.  We ate it warm, and it still had chunks of apple in it.  So I chose to make mine a little chunky.  Well, a lot chunky.  As I was peeling and chopping, a sprinkled a little lemon juice over the apple chunks as I added the new chunks to prevent them from turning brown before I got them on the stove. 

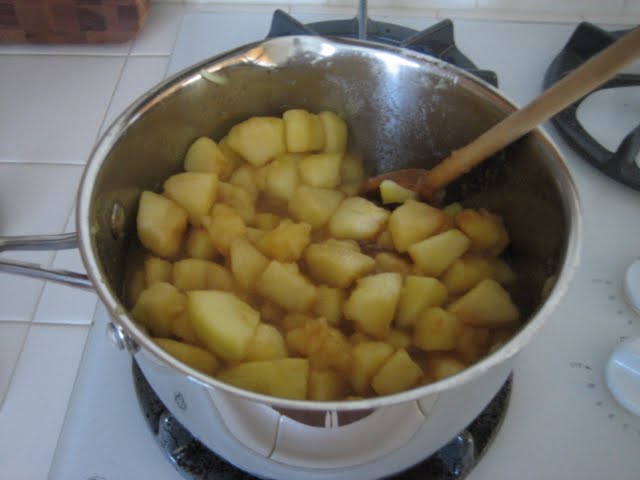
Once the apples were chopped and ready to go, I dumped them in a large saucepan with about a cup of water, brought the water to a boil, and let it simmer for 10 minutes or so, stirring occasionally.  The length of time you cook the apples for will depend on how big you make your chunks and how chunky you want the final sauce to be.  Bigger chunks means more cooking until they are tender.  If you want the sauce to be smooth, cook it until the chunks are very tender.  If you want chunks, they don’t have to be quite as tender. 

When the chunks were a bit short of my desired done-ness, I added about 6 tablespoons of sugar and a teaspoon of cinnamon.  I would have added a bit of nutmeg as well, but I didn’t have any.  At this point, I started to stir the sauce continuously.  This breaks down the apples and gives you the nice saucy consistency, as opposed to a bunch of cooked apples sitting in hot water.  I stirred for probably about 5 minutes until the sauce was the chunky consistency I wanted.  If you want it smoother, hopefully you cooked your apples a bit longer to being with and you can be more vigorous with your stirring and add a little mashing action.  And if you want it really smooth, you can run it through your food mill.  Because everyone has a food mill sitting around. 

I dished out the first two bowlfuls while it was still piping hot, and it was delicious!  I thought the chunky-ness of it made it taste like hot apple pie, so I am calling it apple pie sauce.  Steve said it didn’t taste like apple pie to him, but what does he know?

© 2009 The Beehive All Rights Reserved

Praising the Pomegranate

November is National Pomegranate Month, so today we will say a few words in honor of the free radical-fighting fruit. 

Native to Persia, pomegranates have been cultivated in Iran, Armenia, Azerbaijan, Georgia, and the Mediterranean region for thousands of years.  The fruit was introduced to the Americas by the Spanish in the late 18th century, and we currently grow it in parts of California and Arizona for juice production. 

The edible part of the pomegranate is the juicy seed casing known as the aril.  High in vitamin C, vitamin B5, potassium, and antioxidant polyphenols, proponents taut pomegranate juice as effective in reducing heart disease and high blood pressure, not to mention scavenging those pesky free radicals.  The seeds themselves, when consumed with the aril, are high in fiber and unsaturated fat. 

The name pomegranate derives from the Latin pomum (“apple”) and granatus (“seeded”). In both Spanish and French, the words for pomegranate and grenade are the same (granada and grenade, respectively), likely due to the fact that the fruit and weapon are similarly shaped.  The French la grenade also gives us the word grenadine, the name of a fruit syrup originally made from pomegranates and widely used in cocktails.   

A while back, we saw on one of my favorite Food Network shows that grenadine is actually a pomegranate syrup.  Our only prior experience with grenadine was Rose’s Grenadine, so we never had any clue that it was in any way related to pomegranates.  Don’t get me wrong, Rose’s is certainly tasty and a staple in most well appointed bars, but it is not much more than sugar syrup with red food coloring.  So we decided to conduct a little science experiment. 

Steve made a batch of home-made grenadine using pomegranate juice and sugar, using a recipe courtesy of that favorite tv chef.  He started out with two bottles of pomegranate juice and after all the cooking and reducing ended up with less than a bottle of syrup.  He also bought two bottles of alternative grenadines to compare it with: the old standby Rose’s and a brand of authentic pomegranate grenadine. 

First, we poured a little bit of each grenadine into the bottom of a glass to compare.  Not surprisingly, the Rose’s was maraschino cherry red.  The store bought authentic grenadine was more of a pale pink, while our home made authentic grenadine was a deep, dark reddish purple.  Both the Rose’s and our home made grenadine were thick, sticky, and syrupy.  The store bought authentic grenadine was pretty thin, though, almost watery.  Finally, the taste test.  The Rose’s tasted like sugar syrup.  The authentic syrups, on the other hand, had a pronounced pomegranate flavor, with the home made syrup being much stronger than the store bought syrup. 

Next, we made a classic cocktail using grenadine: the Tequila Sunrise.  We mixed three identical glasses of tequila and orange juice and added a splash of grenadine to the top of each one.  Bar far, the Rose’s would win any cocktail beauty contests, giving the top of the drink a rosy blush.  The store bought authentic grenadine was virtually undetectable to the human eye.  And the home made authentic grenadine . . . well, it looked pretty gross, like a gray glob floating in the drink. 

Flavor-wise, the store bought authentic grenadine won out.  Although it wasn’t visible, it certainly added flavor to the drink.  And the home made syrup, well . . . surely the unappetizing look of the drink contributed to the fact that neither of us thought the final drink tasted good at all.

So there you have it, a few fun facts about pomegranates and our thoughts on various types of pomegranate syrup. 

© 2009 The Beehive All Rights Reserved

Creepy Cookies

I went to the craft store last week to get balsa wood to make some faux Roman shades for our guest room.  More on that later.  I expected to do a little browsing because this particular store was new to me, but I was unprepared for the 60% off Halloween and general fall decorations that assaulted me as I walked in the door, so of course I had to walk away with a few items, including a haunted gingerbread house kit. 

I’ve been known to create a gingerbread house or two in the past:

I thought the kit would be a quick little diversion without the headache of making my own gingerbread and icing, deciding what kind of candy I wanted to decorate with, etc.  This particular kit came with pre-cut cookie pieces, packets of orange and black icing mix, two piping bags with decorator tips, various candies for decorating, and directions for decorating in three alternative styles, which I promptly threw out the window when I got to the part about letting the base of the house set for an hour before proceeding. 

I was amazed that these two pale powders mixed up to bright orange and deep black with just a couple tablespoons of water.  I was a bit disappointed in the consistency, though.  The orange was extremely runny after  following the mixing instructions and I had no powdered sugar to add to stiffen it up.  Another reason I threw the directions out: I couldn’t do the suggested piping with such loose icing.  The instructions also suggested cutting the jellybeans in half with a sharp knife.  Have you ever tried cutting stale jellybeans in half?  I just about cut my fingers off three or four times, and I don’t recommend it. 

Despite the few minor hiccups, this is how it turned out.  Not my best work, but not bad for an hour or two with a $10 kit.

© 2009 The Beehive All Rights Reserved

Adventures in Garbage Disposing

Last weekend, I started a batch of limoncello.  I spent some time looking at recipes on the internet, and decided a combination of techniques that I thought would work for me.  I took the peel — no pith — from about ten lemons and dumped it in a pitcher with a bottle of Everclear (151 proof) and let it sit for a week. 

Digression:  Have you ever read the label on a bottle of Everclear?  I think there are less warnings on common household cleaning chemicals.  WARNING!! Overconsumption may endanger your health.  CAUTION!! Extremely Flammable Handle with Care.  There is a whole paragraph of warnings:

Caution: Do not apply to open flame.  Keep away from fire, heat, and open flame.  Contents may ignite or explode.  Do not consume in excessive quantities.  Not intended for consumption unless mixed with non-alcoholic beverage.   

(Emphasis added.)  So I guess it makes sense that this stuff is illegal in some states, as it is explosive and not suitable for human consumption.  But back to the real story.

Today, satisfied that the alcohol had stripped the lemon peels of all their lemony goodness, I finished the limoncello.  First, I strained out the lemon peels, leaving me with some strong lemon-infused grain alcohol.  Then I made a pseudo- simple syrup.  I decided to make limoncello crema, so I made the syrup with milk and half and half instead of water.  This involved a little bit of experimentation on my part.  I found a number of variations of the recipe, some calling from milk and some calling for half and half.  So I split the alcohol mixture in half and made half with whole milk and half with half and half (say that three times fast).  For anyone that wants to attempt, that was one pint of either whole milk or half and half simmered with 1.5 cups sugar until the sugar is completely dissolved for HALF of the alcohol.  Let the sugar mixture cool and add to the alcohol.  Bottle and refrigerate/freeze.  I haven’t tasted either version chilled yet, so the jury’s still out as to whether milk or half and half is the better choice.

When I was finished, I was left with a sieve full of brittle lemon peels.  One of the internet recipes I read suggested putting them through the garbage disposal to “freshen” it up, which seemed to make sense to me since I’ve heard before you can put some citrus wedges down it to make it smell fresher.  So — and here’s the REAL point of the post — I put the lemon peels down the garbage disposal and fired it up.  Seemed to work just fine, until the next time I used the disposal. 

I washed the dishes later in the day, and when I drained the sink, I switched on the disposal to clear out any stray bits of food.  Suddenly, the water stopped draining and murky black stuff started to come up through the drain.  Insert random expletive here.  I was pretty sure this was not something I could fix myself.  I’m handy, but just not that handy.  And now is really not a good time to be staying home from work to wait for a plumber.  Steve stepped in about here, but he knows about as much about fixing a disposal as I do.  We cut the power to the disposal and I reached my hand in to see if there was something jammed in it.  He pressed the reset button.  Still spewing black stuff.  We were resigned to calling a plumber.

In a last ditch effort to to DIO (do it ourselves), I called my dad for advice.  I explained to him that the motor appeared to be working when we turned the disposal on, but nothing was going down the drain.  This led him to believe it was a clog, not a problem with the disposal itself, and he suggested a plunger.  Five minutes later, water was flowing freely down the drain and there was no black stuff to be seen.  Woohoo!

Dad can pretty much always save the day, can’t he?

© 2009 The Beehive All Rights Reserved

A Fabulous Fourth

We’ve been slacking on posting about our 4th of July fun.  My dad had been prompting the whole family to “think about the 4th of July” for several weeks in advance.  Which means he wants to throw a party.  Or rather, he wants someone else to throw a party and that is his way of hinting at it.  That Dad, he’s such a character!  I think he was excited about our first holiday with his new granddaughter, who pretty much stole the show.

A nice crowd turned out at my parents’ house, including me and Steve; my brother; my sister, her husband (the other Steve), and their baby; the other Steve’s parents; one of my aunts, and two of my cousins and their significant others.  Our family is all about casual, it’s just the way we roll, but my mom spruced things up with some festive patriotic napkins draped on the table, some dressed up daisies, and some sweet red strawberries that blended right in with the holiday color scheme. 

7-04-07-table-decor-2

And to keep things simple and casual, we did a basic BBQ, complete with burgers, dogs, and all the fixings.  The sides and snacks were supplied potluck-style by the guests.  We had no shortage of choices, including a green salad chock full of goodies like avocado and corn, three bean salad, two different types of guacamole with chips, and our family’s favorite potato salad (which I probably will rarely ever make given Steve’s distaste for potatoes!  sigh!).  There were plenty of frosty beverages in an ice-filled cooler on the patio and free flowing margaritas.  And we capped the whole thing off with Neapolitan ice cream and home-made chocolate chip cookies.

7-04-09-buffet tater-salad

Aside from coaxing my sister’s five-week-old daughter to roll over (yes, she does it, she is a prodigy!), my sister’s dog Maggie and my cousin’s dog Fender provided the entertainment.  Maggie is a yellow lab with tons of energy, and Fender is a Welsh Corgi with a bit of a round belly.  The two dogs had never met before and they got a bit rambunctious and eventually had to be separated.  I didn’t manage to get any pictures of it because, well, I was preoccupied with the baby.  In fact, I barely got any pictures at all.  But here’s is Maggie looking forlorn and wondering why Fender gets to continue playing outside while she is relegated to the kitchen. 

7-04-09-maggie-1

Hope your holiday weekend was great too!

2009 © The Beehive All Rights Reserved

When in Brussels

brusselssproutsmacro

To put it mildly, Steve is a picky eater.  Here are some examples of foods he does not like: potatoes, mushrooms, cucumber, tomatoes, zucchini, eggs, and peppers.  Needless to say, I was shocked to learn that he enjoys Brussels sprouts of all things, particularly a recipe his mom makes for Brussels sprouts with prosciutto or capicola.  We made it recently, slightly modified to feed the two of us, rather than a crowd, and it was quite tasty.

brusselssproutsmacro meltedbutter finishedsprouts


First, we picked out some nice sprouts at the grocery store, washed them up, trimmed the ends, and peeled off the outer leaves.  No fancy measuring, we just guessed about how much each of us would want to eat.  Next, we dropped the sprouts in a pot of boiling water, liberally seasoned.  The sprouts should boil until just tender, maybe 7-10 minutes.  Don’t let them go too far because they will get a bit of additional cooking time with the sauce. 

Speaking of sauce, while the sprouts are boiling away, you can get started working on it.  Melt a generous amount of butter in a skillet.  Throw in a couple of chopped scallions (green onions) and let them saute until tender.  Tip: if you are worried about burning the butter, add a bit of olive oil to the skillet.  It has a higher smoke point than butter, so you’ll be less likely to burn the sauce.  Chop up some prosciutto or capicola and add that to the mix.  We used capicola this time, which Steve likes because it’s got some spice to it.  Let that saute for a bit until the meat gets a bit brown. 

Add your well-drained sprouts to the skillet and stir to evenly combine.  Season with salt and pepper.  I like to let the sprouts cook a while in the skillet  so they’ll get some browned crispy bits on the outside, but you can cook to your taste.  Enjoy!

2009 © The Beehive All Rights Reserved

Pesto Change-o

Typically, when I open a jar of pesto, I use the whole thing on a batch of pasta.  But, when I made my cheesy pesto bread twists a while back, I had to open a jar and had plenty to spare.  I had no trouble finding a use for it.  In fact, I was glad to have it to make one of my favorite easy meals, pesto grilled cheese.

I take a couple of slices of sourdough bread and spread them with a thin layer of pesto.  Then I layer in some cheese, typically mozzarella, but this time I threw in some provolone as well.  Sandwich it, slather a bit of butter on the outside, and throw it in a skillet until the cheese is ooey and gooey and the bread is golden brown.  Yum!

pestogrilledcheesespreadpesto pestogrilledcheeseinpan finishedpestogrilledcheese

This recipe is super-versatile, too.  You could add a few strips of roasted red pepper or sun-dried tomatoes, maybe some sliced olives, mix up the cheese a bit (I bet some shaved parm would be great), try some different bread, or use olive oil to coat the bread instead of butter.

2009 © The Beehive All Rights Reserved

Backyard Bounty


It looks like the backyard may yield a fair amount of fruits and veggies for our eating pleasure this year, and we haven’t even done much to it in terms of amending the soil, new planting, etc.

There were several fruit trees here when we moved in.  We’ve got three trees that appear to be citrus of some sort, one of them with fruit on it.  It looks like lemons, but it’s hard to tell until they either turn yellow or don’t.

lemonmacro1

There’s also a nectarine, which is one of my favorites.  It looks like it’s got a problem with some curly leave disease, so we’ll have to take care of that, but it’s still got fruit on it that I can’t wait to eat.

nectarinemacro2 nectarinemacro1

There is a persimmon as well.  Did you know that persimmons were known in ancient Greece as “fruit of the gods”?

persimonmacro2 persimonmacro1

Then there is the mystery bush.  It’s got tiny berries on it that look dark purple or black when ripened.  They may or may not be edible, but we are staying away from it for the time being.

Of course, we planted a few things ourselves.  Three tomato plants, a cucumber, and some strawberries, to be exact.  The strawberries may be done.  We previously posted pictures of the small berries, but they’ve since been eaten.  One of the tomato plants has some fruit on it, as does the cucumber.

cucumbermacro1 tomatomacro1

2009 © The Beehive All Rights Reserved

Stewing Around

finishedbeefstew

Last week, we decided to do a basic beef stew in our slow cooker.  We are both big fans of Dinty Moore beef stew, so when we came across this recipe, we had to try it.  Here are the ingredients:

  • 4 carrots
  • 1 onion
  • 12 oz. small red potatoes
  • 9 oz. bag frozen cut green beans
  • 1 can cream of celery soup
  • 1 can beef broth
  • 1/2 tsp. dried marjoram
beefstewmisenplace beefstewchoppedveggies

The whole thing was pretty simple to throw together.  I chopped up the carrots, onion, and potatoes and threw them in the slow cooker pot with the marjoram, cream of celery, and beef broth and stuck it in the refrigerator overnight.  I pulled it out and plugged the cooker in before work and let it cook on low heat for 9 hours (our slow cooker automatically turns down to “warm” once the cook time has been reached).  At least that’s what I thought I did.  When we got home from work, I was all set to turn the cooker to high, add the green beens, and cook for an additional 20 minutes.  But it was already on high!  Not sure how that happened, but we pressed on and cooked it with the green beans another 20 minutes. 

beefstewincooker  finishedbiscuits

Amazingly, I don’t think the too high, too long cooking did much to it.  None of the veggies were mushy and overcooked, and the meat was fine too.   Alas, Dinty Moore it was not.  We’ll keep trying different beef stew recipes until we find one as good or better.

No fancy inspiration for a bread product this week, though.  We had plain ol’ buttermilk biscuits from a can.

2009 © The Beehive All Rights Reserved

Winning Lemonade Stand Fare

With Steve working so hard in the yard pulling weeds last weekend, I decided to whip him up a refreshing beverage: basil lemonade.  Ok, you caught me.  I’m the one that craves the basil lemonade.  He would be just as happy with his Country Time mix.  I made it for me.  That doesn’t make it any less tasty, though.  Here’s how I make it:

Start by making a basic simple syrup.  Combine equal parts sugar and water and bring to a gentle boil in a saucepan.  Simmer it for five minutes and remove from the heat.  Here’s where the basil comes in.  Drop a handful of basil leaves into the syrup and let it steep until the syrup is cool.  I use the not-so-pretty leaves that wouldn’t look nice on the table because as soon as they hit the hot syrup they will wilt and look not so pretty.  When it’s cool, strain the basil leaves out using a sieve and you’ve got yourself basil syrup.

basil1 basil2

 The basil syrup is what you will use to sweeten your lemonade instead of sugar to give it a hint of basil flavor.  The proportions I use are 1 part lemon juice, 1 part basil syrup, and three parts water, but you can play with it to suit your tastes.  When I make one glass, I use 1/4 cup lemon juice, 1/4 cup syrup, and 3/4 cups water.  For a larger batch, I’d use 1 cup lemon juice, 1 cup syrup, and 3 cups water. 

basil3

So there you have it, a unique and refreshing beverage to quench your thirst on hot summer days.  You can use the syrup for other beverages too, if you like.  Basil infused iced tea would be great, for example.  The technique also works for anything you can steep, so if basil is not your thing, try mint or another herb.  I once made a cilantro syrup for cilantro infused limeade.  Experiment and find what you like, but seriously, this basil lemonade is good.  Salute!

2009 © The Beehive All Rights Reserved