Creepy Cookies

I went to the craft store last week to get balsa wood to make some faux Roman shades for our guest room.  More on that later.  I expected to do a little browsing because this particular store was new to me, but I was unprepared for the 60% off Halloween and general fall decorations that assaulted me as I walked in the door, so of course I had to walk away with a few items, including a haunted gingerbread house kit. 

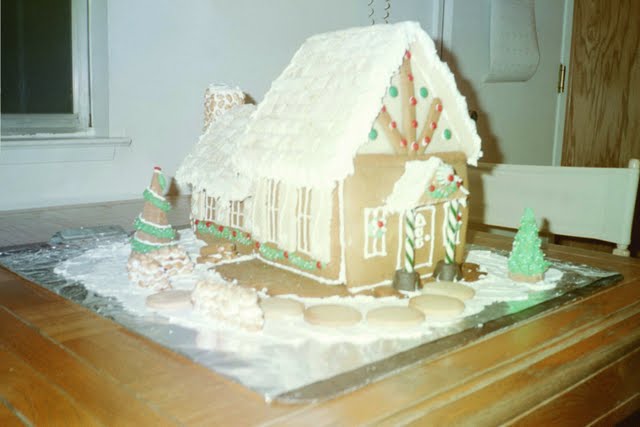
I’ve been known to create a gingerbread house or two in the past:

I thought the kit would be a quick little diversion without the headache of making my own gingerbread and icing, deciding what kind of candy I wanted to decorate with, etc.  This particular kit came with pre-cut cookie pieces, packets of orange and black icing mix, two piping bags with decorator tips, various candies for decorating, and directions for decorating in three alternative styles, which I promptly threw out the window when I got to the part about letting the base of the house set for an hour before proceeding. 

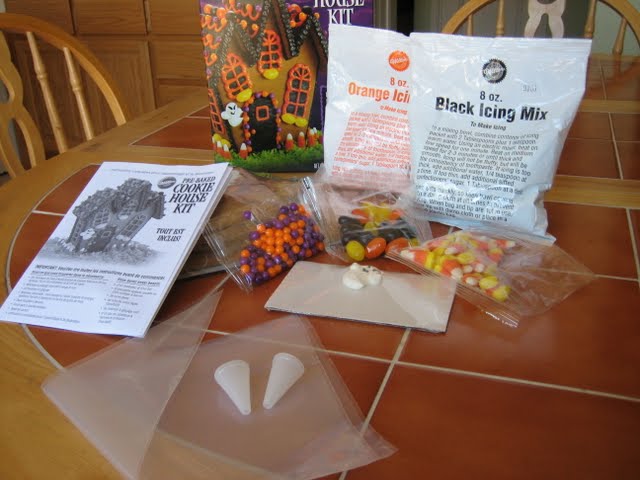
I was amazed that these two pale powders mixed up to bright orange and deep black with just a couple tablespoons of water.  I was a bit disappointed in the consistency, though.  The orange was extremely runny after  following the mixing instructions and I had no powdered sugar to add to stiffen it up.  Another reason I threw the directions out: I couldn’t do the suggested piping with such loose icing.  The instructions also suggested cutting the jellybeans in half with a sharp knife.  Have you ever tried cutting stale jellybeans in half?  I just about cut my fingers off three or four times, and I don’t recommend it. 

Despite the few minor hiccups, this is how it turned out.  Not my best work, but not bad for an hour or two with a $10 kit.

© 2009 The Beehive All Rights Reserved

Weekend Update

This weekend felt extremely busy, but looking back it does not seem like we did all that much.

Saturday we finally got out and tested the sprinkler system.  The prior owner had mapped it out for us, but strangely lost the map prior to moving out.  So we’ve been watering by hand since we move in back in April, which not surprisingly has been a bit sporadic and some of our plants are starting to show it.  Saturday morning, Steve went on to Google maps and printed a satelite photo of the house.  We started with zone one on our sprinkler box and started filling in the map.  The box has the capability to handle 18 zones, 8 through 18 of which currently do absolutely nothing as far as we can tell.  Also, none of them control the backyard, which clearly has a drip system throughout.  We figured out later that there is a hose that connects to the drip system and apparently the prior owner just hooked it up manually to the spigot on the side of the house whenever she did that watering.  In any event, the drip hoses have seen better days.  There are multiple splits in the main line and almost nothing comes out the actual drip points, so it’s going to need some overhauling. 

Saturday afternoon, we went shopping for a birthday present for our now 5-year-old friend, Abby.  As much as I loved Toys ‘r’ Us when I was a kid, I really dislike it now.  I never imagined it would be so hard to shop for a 5-year-old!  We picked out something we hoped she would like and moved on to our next errands: JC Penney to check out window treatments and Home Depot for some yard stuff. 

Penney’s was kind of a disappointment.  We have tall ceilings in our family room, so we needed some lengthy curtains, and it seemed they mostly only had standard 84 inch panels, which was too short.  But still, we got an idea of what they had, and were able to order some online later that evening.  I’ve had a backache for the past few days and I needed to go home and lay down, so we skipped HD. 

Sunday we spent an awful lot of time doing just general chores, which had been put off all week long (we should know better).  Then, of course, the birthday party, and finally home to relax.  Sort of.  I did not feel like watching my sixth auto race of the weekend, so I pulled out our leftover paint and slapped a coat on the upstairs bathroom while Steve watched Indy car from Sears Point Raceway.  Probably not the best thing for my back, but really there is only so much racing I can take. 

And that’s about it.  I’m certain there will be much more to come on the sprinkler system, as that needs a lot of work.  And I’ve been taking pictures of the bathroom as I go, so I’ll be posting those as soon as I can download them from my camera and re-size them for posting.  Because I know the three of you reading this are on the edge of your seat just waiting to see our upstairs bathroom.

© 2009 The Beehive All Rights Reserved

House Tour Part VI: The Downstairs Bath

This is our downstairs bathroom. When we moved in, it was a strange brownish orange (which might be called “baby crap” depending on what your baby’s been eating) and had a dolphin-covered disposable shower curtain.

bathroombefore2 bathroombefore1

I had never seen a disposable shower curtain before. Turns out they are actually quite useful.

bathroomduring1

We had leftover paint from the family room and kitchen, and this bathroom is right off of those two rooms, so it made sense to continue on with that color.

bathroomduring3 bathroomduring2

But wait! There’s more! In an effort to make it look like this was not the same old thing over and over again, I painted some stripes on the walls. This involved some (sort of) careful measuring, blue painters tape, and a handy laser level. One thing I learned is that a textured wall makes it difficult to get a nice crisp line. In order to prevent the paint from seeping under the tape into the lower levels of the texture, you need to make sure you firmly press the tape down into the divots so there is no seepage. Here is the finished product.
bathroomafter2
bathroomafter1

bathroomafter3

© 2009 The Beehive All Rights Reserved

No More Salmon in the Kitchen

The color, that is. Actually, now that I think about it, we’ve never had the fish in the kitchen either, and given Steve’s distaste for it, we probably never will. So interpret how you please.

Back to the point of this post, when we moved in, the walls in the family room and kitchen looked like they were dripping with Pepto Bismol. We took care of the family room first, and the kitchen was next on our to-do list. Here’s what it looked like before:

before-kitchen-5 before-kitchen-6 before-kitchen-3

It doesn’t look like it should be too difficult a paint job, because there is not a whole lot of area to cover. As usual, it didn’t quite turn out that way. The tight spaces and numerous corners made it very time consuming. But it turned out fabulous.

kitchen-after-1 kitchen-after-2

kitchen-after-3

Doesn’t it look like a different room? I think the green paint looks so much nicer with the blonde wood cabinets. The ceiling still needs a coat of paint, and I look forward to getting rid of the rug under the kitchen table, but already it is so much more pleasant to be in the kitchen and family room now.

© 2009 The Beehive All Rights Reserved

The Blind Leading the Blinds

When we moved in, there were no blinds installed in the dining room or living room.  There were decorative draperies, but nothing that you could really shut to keep the sun out or prevent the neighbors from looking in and seeing you running around naked.  The seller did, however, leave several sets of blinds behind in a closet, which she said were for the living room, dining room, and garage.  She urged us not to install them, though, so that all that beautiful sunlight could shine in.  That sun isn’t so beautiful when it’s 103 degrees outside and the sun is beating in.

blindinstallbefore

I think in response to several extremely hot days, Steve decided he was going to hang the blinds.  Obstacle #1: There are two large windows in the dining room, two large windows and two small windows in the living room, and two large windows in the garage.  There are only four sets of blinds.  Easily overcome.  We  don’t really need the blinds in the garage right now, so we’ll just use them on the large windows in the dining room and living room (as they are clearly too large for the small windows).

Obstacle #2:  The blinds were not all the same size, as were the windows in the living room and dining room where the blinds were to be installed.  Although all the blinds were the same width, two of them were about a foot too short for the windows.  Steve scavenged the house to see if maybe some other rooms with a same width windows had blinds that were way too long.  He did find one.  That’s right, just one.  So after he switched the too long blinds for the shorter ones in the closet, we were left with three sets of right sized blinds and one too short, with no window anywhere in the house that would accommodate it.

blindinstalldrill2 blindinstallscrew blindinstallhang

So we installed blinds in three of the four windows and put the last set back in the closet, for the moment.  The installation was incredibly easy.  Steve measured and marked for bracket placement.  Each bracket had four screws, for which Steve pre-drilled the holes.  He used a dremel to fit better into those tight spaces than a big power drill.  Once the brackets are installed, all you have to do is slide in the blinds and clip the bracket shut. 

blindinstallafter

We’ve been very happy with the blinds so far.  They help a great deal to control the temperature inside the house on hot days.  We’ll be shopping for that last large set and too small sets of blinds soon.

© 2009 The Beehive All Rights Reserved

Finally Finished!

Here is the completed paint job in the family room, with all the furniture put back in place. We recently got a new tv stand and audio tower, largely because we wanted the use of our coffee table/make-shift tv stand back.

after-family-room-4 after-family-room-1
after-family-room-3 after-family-room-2

In the works for this room: New curtains; new stain on the coffee table; new-to-us couch, and a few other things.

2009 © The Beehive All Rights Reserved

Size Matters

For our family room painting project, we purchased a 5 gallon bucket rather than several 1 gallon cans of paint.  Why?  It’s cheaper to buy in bulk and we knew we would be using most of it because we were painting two large rooms.  Buying in bulk can backfire, though.  A great deal on a jumbo package of breakfast pastries is not such a great deal if half of them spoil before you can eat them. 

A 5 gallon bucket is extremely unwieldy.  I should’ve guessed this when I saw Robert the paint guy use a dolly to bring the giant bucket of interior eggshell base to the paint center for mixing.  I strained to get it into the trunk of my car, and I strained to get it out of the trunk of my car.  I felt like a competitor in the World’s Strongest Man competition as I hoisted it and shuffled from the garage to the family room with veins bulging from my neck.  I struggled to pry the lid off only to discover that it had to be stirred — and stirring was no easy task for that volume of paint.  And pouring from the bucket to a paint tray?  Not an option. 

The bottom line is, the big bucket is hard to handle and extremely messy.  It is about $2 cheaper per gallon than buying individual gallon cans, so we saved about $10 altogether.  Was it worth it?  No way, Jose.  I wasted a lot of time trying to figure out what to do with this big heavy bucket, and I probably spilled $10 worth of paint over the course of the project anyway.  Unless you are a body builder who doesn’t mind messes, I’d shell out the extra cash for smaller cans.  But that’s just me.

Luckily, the bucket is about half empty now . . . because we finally finished painting the last corner of the family room.  We’re still putting the pieces back together, so the final “after” pictures will have to wait.

familyroomfinalcorner2 familyroomfinalcorner1 familyroomfinalcorner3

Now, on to the kitchen . . .

2009 © The Beehive All Rights Reserved

Still More Painting

It’s time to share a little bit more progress on the family room painting project.  I’m happy to say we are probably about 2/3 done now.  We tackled the outer wall with the windows last weekend.  This area required a lot of prep work because we had to remove the blinds and hardware and tape of the windows.  Sounds pretty obvious, but the prior owner didn’t bother, as evidenced by the pink paint here and there on the blinds, outlet covers, and wall switches.  The room actually looked great when we removed the blinds early in the morning.  It felt really open and you could gaze upon the gorgeous backyard.  That feeling did not last long into the afternoon as the sun started beating in.  It was brutal trying to paint in the scorching heat with the sun glaring in!  Here’s the work-in-progress.  I believe this is actually just after the second coat was finished, so we were just waiting for it to dry so we could remove the painters tape and put things back together. 

familyroompaintinginprogress

And here’s the finished wall.  Of course, there still is one large pink corner left in the room.  We’ve saved it for last because it’s the corner housing the television and components, and it’s not going to be fun to untangle that mess of cords and get it out of the way to paint without fear of drips on precious AV equipment.  

2-3rdspaintedfamilyroom2

Fingers crossed we can do that last corner all at once.  My hope is that it won’t be too bad because there aren’t a lot of windows or edges so it should go quickly.  Of course, my hope with the window wall was that it would go quickly because there was not much surface area to cover . . .

2009 © The Beehive All Rights Reserved

Paint it Green

You might remember that we removed the curtains from the family room and painted the ceiling a pale green a while back.  Well, we’ve now started on the walls.

halfpaintedfamilyroom2

The color is Glidden’s Sea Drops, which is a little bit darker than the Iced Cilantro on the ceiling.  We are hoping some crisp white crown molding will make that distinction pop. 

And you’re right, I did say started with the walls, which clearly implies we are not finished.  So we’ve got a half green, half pink room.  Nice!  We’ll continue working on this project and keep you posted.

halfpaintedfamilyroom1

2009 © The Beehive All Rights Reserved

Mulch it Over

It’s been a few weeks since we put our two tomato seedlings and cucumber in the ground, and they seem to be doing pretty well. 

garden3

I’ve noticed a few weeds in the bed, though, and I think it’s time to add a little mulch to the top of the soil.  Here’s the after picture.

garden-4

Although I turned in some rich potting soil when I planted these babies, it seems to have blended in with the hard-as-rock dirt indigenous to our backyard.  The mulch certainly makes the top look a bit healthier and uniform.  Hopefully it will help the soil to retain moisture longer, and maybe even keep the weeds at bay a little bit by blocking the sunlight. 

While I’m at it, I always take a look at the topsy turvy.  Still no actual fruit on it, just the blooms, but I wouldn’t have expected anything just yet anyway.

topsyturvy8 topsyturvy7

The strawberry pot looks good as well, but alas, some critter has eaten the fruit off of it.  I did get to taste one first. 

strawberry3

2009 © The Beehive All Rights Reserved