Yes, We Still Eat **or** Black Bean and Kabocha Squash Soup

School has kept me quite busy lately, so obviously I haven’t had much time to post anything.  Steve has also been extremely busy doing taxes, so we haven’t been doing much cooking or eating of interesting things.  But, I was thinking I had some pictures of an interesting soup I made a while back that I should write about.

I got a cookbook from Steve’s parents for Christmas called “Love Soup.”  It’s full of vegetarian soup recipes, organized more or less by time of year, so there is a section with hearty filling soups for cook weather and lighter refreshing soups for warmer weather.  My first attempt at one of these recipes was Black Bean and Kabocha Squash Soup.

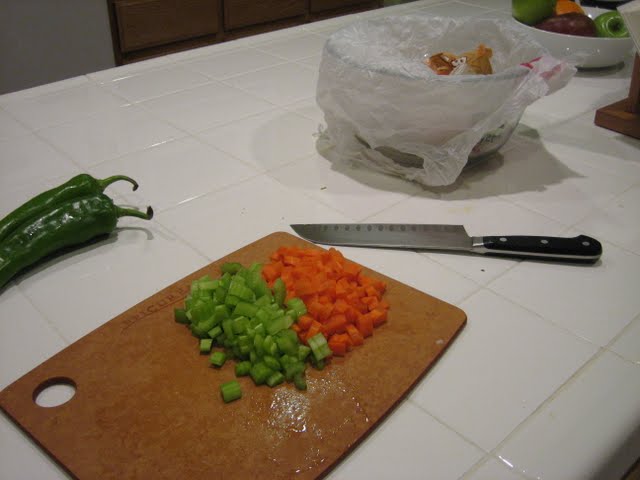
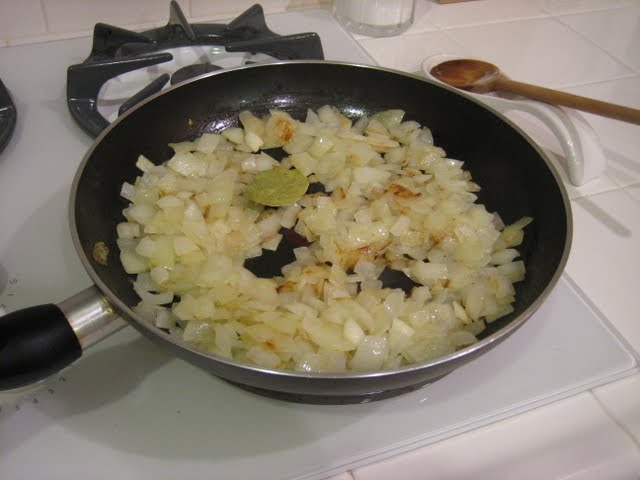
I started with a classic mirepoix — onions, carrots, and celery.  Onions went in first, with a couple of bay leaves.  Then the carrots and celery.  The recipe also called for 1 or 2 jalapeño peppers.  These were not available at the grocery store, so I picked up a couple of Anaheim peppers instead, and chose to use 2 because they have a little less heat than jalapeños.

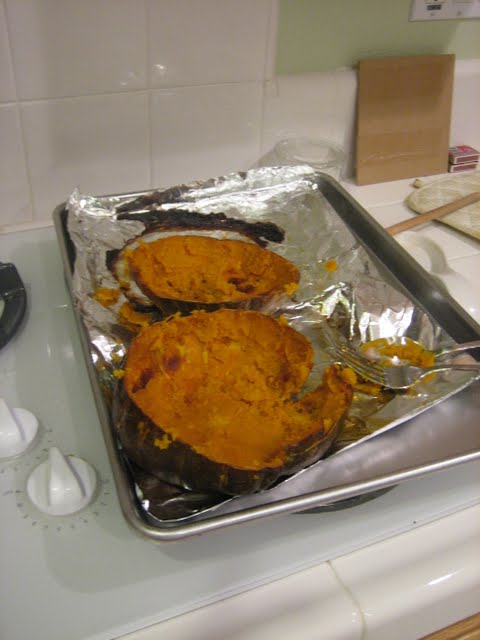
While I sauteed the onions, carrots, celery, and peppers, I had a kabocha squash — cut in half and seeded — roasting in the oven.  It was nice and tender after about 45 minutes.  At that point, I let it cool until I could handle it and scoop out the insides.

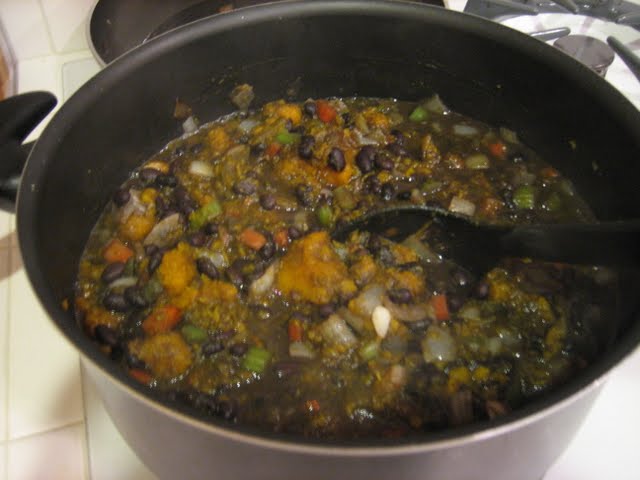
Back to the stove.  Once the onions, carrots, and celery were a bit softened, I removed the bay leaves and put the mixture in a big pot with two cans of vegetable broth.  Ok, so I used chicken broth because I already had it in the cupboard.  I’m not a vegetarian, so it doesn’t concern me.  Do what you want.  Once I brought that to a simmer, I added two cans of black beans, drained and rinsed.  And finally, the cooked squash.

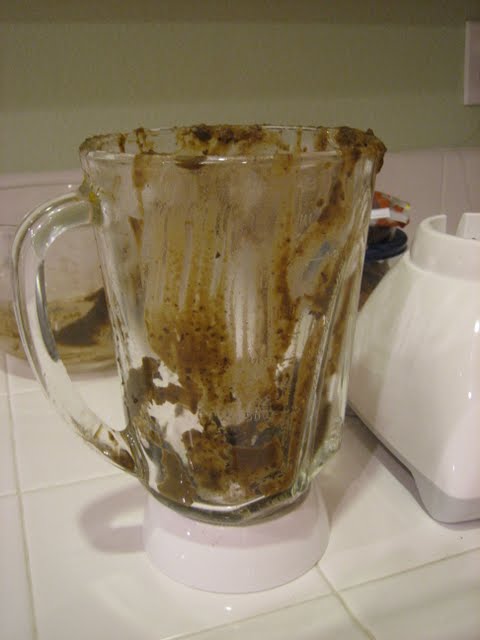
Once that is simmered for a bit, the mixture gets blended into a smooth soup.  I blended it in batches in our counter top blender, since we don’t have an immersion blender.  Honestly, I do not recommend this method.  Messy would be an understatement.  I’m not doing it again until I get an immersion blender.

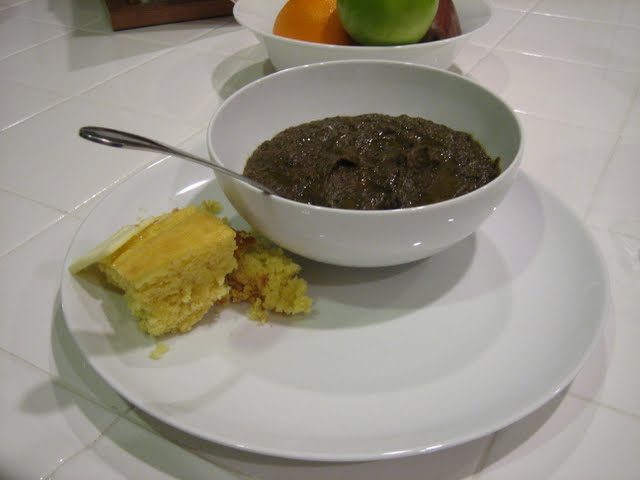
And that’s it!  We ate it with corn bread.  The soup does not look real appetizing to me.  I had a hard time taking the first bite.  But it sure was tasty!  Surprisingly rich, though.  A small bowl is really all I could handle.  I feel the same way about split pea soup.  I can only take so much of it.

© 2010 The Beehive All Rights Reserved

Have Some Stew, Tuscan-Style

One positive result of unemployment is that I have been cooking a lot more than I used to.  The other night, I made Tuscan Chicken Stew for dinner.  It went something like this:

I bought a package of chicken thighs, a little over two pounds.  The original recipe called for skinless bone-in thighs, which my grocery store did not have, so I was stuck skinning them myself.  Not my favorite kitchen task.  I really don’t like touching raw meat, so I used latex gloves a la Alton Brown, which made it much less gross.  I coated the bottom of our cast iron dutch oven with a little olive oil, seasoned the meat, and browned it on both sides. 

While the chicken was browning, I chopped an onion and minced a few cloves of garlic.  I added the chopped veggies to the dutch oven after removing the browned chicken to a platter.  Let those cook a few minutes until the onion is translucent.  Then, add a tablespoon of tomato paste.  Stir the paste in and let the mixture continue cooking until it is well mixed and becomes a brick red color.  Next, add about half a can of chicken stock to the pot to deglaze.  You can substitute wine here if you like, but we aren’t big wine drinkers and generally don’t have any sitting around and ready to use in recipes, so the stock works just fine.  Let it boil down until it is a bit syrupy.  Then add the rest of the can of stock, a can of rinsed and drained white beans, and a can of diced tomatoes.  Nestle the chicken pieces into the stew and let it simmer for about 20 minutes or until the chicken is cooked through.  Then, add about eight ounces of baby spinach and simmer another minute or two until the spinach is wilted.  Serve and enjoy. 

When I made this, I really was not in the mood for it.  I really did not want anything tomato-y, but I had purchased the ingredients and needed to cook it before anything went bad.  I was pleasantly surprised.  The meal was hearty and extremely tastey.  It’s chock full of veggies and lean protein, too.  My only qualm with the dish is the bone-in meat.  It takes a bit or work to eat when it’s in a stew.  I’d say just use boneless thighs, but that would change the cooking times and the bones might add flavor to the stew that would be missed if they weren’t there. 

© 2009 The Beehive All Rights Reserved

When in Brussels

brusselssproutsmacro

To put it mildly, Steve is a picky eater.  Here are some examples of foods he does not like: potatoes, mushrooms, cucumber, tomatoes, zucchini, eggs, and peppers.  Needless to say, I was shocked to learn that he enjoys Brussels sprouts of all things, particularly a recipe his mom makes for Brussels sprouts with prosciutto or capicola.  We made it recently, slightly modified to feed the two of us, rather than a crowd, and it was quite tasty.

brusselssproutsmacro meltedbutter finishedsprouts


First, we picked out some nice sprouts at the grocery store, washed them up, trimmed the ends, and peeled off the outer leaves.  No fancy measuring, we just guessed about how much each of us would want to eat.  Next, we dropped the sprouts in a pot of boiling water, liberally seasoned.  The sprouts should boil until just tender, maybe 7-10 minutes.  Don’t let them go too far because they will get a bit of additional cooking time with the sauce. 

Speaking of sauce, while the sprouts are boiling away, you can get started working on it.  Melt a generous amount of butter in a skillet.  Throw in a couple of chopped scallions (green onions) and let them saute until tender.  Tip: if you are worried about burning the butter, add a bit of olive oil to the skillet.  It has a higher smoke point than butter, so you’ll be less likely to burn the sauce.  Chop up some prosciutto or capicola and add that to the mix.  We used capicola this time, which Steve likes because it’s got some spice to it.  Let that saute for a bit until the meat gets a bit brown. 

Add your well-drained sprouts to the skillet and stir to evenly combine.  Season with salt and pepper.  I like to let the sprouts cook a while in the skillet  so they’ll get some browned crispy bits on the outside, but you can cook to your taste.  Enjoy!

2009 © The Beehive All Rights Reserved

Pesto Change-o

Typically, when I open a jar of pesto, I use the whole thing on a batch of pasta.  But, when I made my cheesy pesto bread twists a while back, I had to open a jar and had plenty to spare.  I had no trouble finding a use for it.  In fact, I was glad to have it to make one of my favorite easy meals, pesto grilled cheese.

I take a couple of slices of sourdough bread and spread them with a thin layer of pesto.  Then I layer in some cheese, typically mozzarella, but this time I threw in some provolone as well.  Sandwich it, slather a bit of butter on the outside, and throw it in a skillet until the cheese is ooey and gooey and the bread is golden brown.  Yum!

pestogrilledcheesespreadpesto pestogrilledcheeseinpan finishedpestogrilledcheese

This recipe is super-versatile, too.  You could add a few strips of roasted red pepper or sun-dried tomatoes, maybe some sliced olives, mix up the cheese a bit (I bet some shaved parm would be great), try some different bread, or use olive oil to coat the bread instead of butter.

2009 © The Beehive All Rights Reserved

Stewing Around

finishedbeefstew

Last week, we decided to do a basic beef stew in our slow cooker.  We are both big fans of Dinty Moore beef stew, so when we came across this recipe, we had to try it.  Here are the ingredients:

  • 4 carrots
  • 1 onion
  • 12 oz. small red potatoes
  • 9 oz. bag frozen cut green beans
  • 1 can cream of celery soup
  • 1 can beef broth
  • 1/2 tsp. dried marjoram
beefstewmisenplace beefstewchoppedveggies

The whole thing was pretty simple to throw together.  I chopped up the carrots, onion, and potatoes and threw them in the slow cooker pot with the marjoram, cream of celery, and beef broth and stuck it in the refrigerator overnight.  I pulled it out and plugged the cooker in before work and let it cook on low heat for 9 hours (our slow cooker automatically turns down to “warm” once the cook time has been reached).  At least that’s what I thought I did.  When we got home from work, I was all set to turn the cooker to high, add the green beens, and cook for an additional 20 minutes.  But it was already on high!  Not sure how that happened, but we pressed on and cooked it with the green beans another 20 minutes. 

beefstewincooker  finishedbiscuits

Amazingly, I don’t think the too high, too long cooking did much to it.  None of the veggies were mushy and overcooked, and the meat was fine too.   Alas, Dinty Moore it was not.  We’ll keep trying different beef stew recipes until we find one as good or better.

No fancy inspiration for a bread product this week, though.  We had plain ol’ buttermilk biscuits from a can.

2009 © The Beehive All Rights Reserved

Winning Lemonade Stand Fare

With Steve working so hard in the yard pulling weeds last weekend, I decided to whip him up a refreshing beverage: basil lemonade.  Ok, you caught me.  I’m the one that craves the basil lemonade.  He would be just as happy with his Country Time mix.  I made it for me.  That doesn’t make it any less tasty, though.  Here’s how I make it:

Start by making a basic simple syrup.  Combine equal parts sugar and water and bring to a gentle boil in a saucepan.  Simmer it for five minutes and remove from the heat.  Here’s where the basil comes in.  Drop a handful of basil leaves into the syrup and let it steep until the syrup is cool.  I use the not-so-pretty leaves that wouldn’t look nice on the table because as soon as they hit the hot syrup they will wilt and look not so pretty.  When it’s cool, strain the basil leaves out using a sieve and you’ve got yourself basil syrup.

basil1 basil2

 The basil syrup is what you will use to sweeten your lemonade instead of sugar to give it a hint of basil flavor.  The proportions I use are 1 part lemon juice, 1 part basil syrup, and three parts water, but you can play with it to suit your tastes.  When I make one glass, I use 1/4 cup lemon juice, 1/4 cup syrup, and 3/4 cups water.  For a larger batch, I’d use 1 cup lemon juice, 1 cup syrup, and 3 cups water. 

basil3

So there you have it, a unique and refreshing beverage to quench your thirst on hot summer days.  You can use the syrup for other beverages too, if you like.  Basil infused iced tea would be great, for example.  The technique also works for anything you can steep, so if basil is not your thing, try mint or another herb.  I once made a cilantro syrup for cilantro infused limeade.  Experiment and find what you like, but seriously, this basil lemonade is good.  Salute!

2009 © The Beehive All Rights Reserved

Soup’s on

dinner


Yesterday I broke out the new slow cooker so we would have dinner (mostly) ready (mostly) when we got home from work.  I made Italian sausage soup, which turned out pretty tasty.

  • 1 lb. bulk Italian sausage (I used mild)
  • 1 large onion, chopped
  • 2 carrots, chopped
  • 2 celery stalks, chopped
  • 2 cloves garlic, minced
  • 3 14 oz. cans of chicken broth
  • 1 8 oz. can of tomato sauce
  • 1 10.5 oz. (I think that’s the size I used) can of diced tomatoes
  • dried oregano, basil, and rosemary
  • 1/2 cup orzo pasta
  • Parmesan cheese

The night before I browned the sausage in a saute pan with the onion and garlic.  Then I added it to the slow cooker pot with the carrots and celery and put it in the fridge over night.  In the morning, I dumped in all the canned ingredients and the dried herbs (which I sort of ground up in my palm first).  Set the cooker on low for 10 hours and go about your day.  After 10 hours, turn it up to high, add the orzo, and cook for an additional 20 minutes.  Serve and garnish with the Parmesan cheese.

Next time I make it, I think I will add more orzo, or maybe even use a slightly larger pasta.  It just seemed like it was barely present in the soup.  Other than that it was quite good.

Of course, soup never quite seems like a complete meal to me, so I made some bread sticks to go along with.

  • 1 can refrigerated pizza dough
  • pesto sauce
  • Parmesan cheese

Lay out the pizza dough (which conveniently unrolls to a rectangle) and spread pesto over half of it, then sprinkle Parmesan cheese generously over the pesto. 

breadsticks1breadsticks2breadsticks3


Fold the blank half over the half with all the cheesy pesto goodness and cut into strips (I used a pizza wheel).  Twist each strip and lay on a backing sheet sprayed with no-stick spray. 

breadsticks4breadsticks5


Bake according to pizza dough package directions, but keep an eye on it as it might cook faster since it’s not covered with pizza toppings.  Voila!

Next time I do this one, I will go heavier on the cheese.

2009 © The Beehive All Rights Reserved